Fecal Sludge Information Management System (FSIMS)
The FSIMS is another core and most important module CWIS. This module enables municipality to digitalize and manage all data related to sanitation systems and services. FSIMS digitalize the complete sanitation service chain from application request for emptying service to the safe disposal of faecal sludge at the treatment plant and the reuse of the treated waste.
- Introduction to FSIMS
- 10.1 FSM Dashboard
- 10.2 Containment IMS
- 10.3.1 Service Providers
- 10.4 Treatment Plant IMS
- 10.5 Performance Efficiency Standards
- 10.6 Emptying Service IMS
Introduction to FSIMS
The FSIMS is categorized into five sub-modules:
i. FSM Dashboard (FSMD): The FSMD provides information related FSM services, overall, from containment emptying to transfer and disposal of waste in the FSTP. FSMD provides information about the number of containments; service providers; resources used for service delivery; applications received and responded; containments emptying status, volume of sludge collected, emptied and disposed; and the revenue generated,
ii. Containment Information Management System (CIMS): The CIMS maintains the information about the containments in the city, with their location information and attribute information such as building identification number (in case of multiple building served one containment, BIN of main building responsible for taking care of the containment), sanitation system type, dimensions, volume, last emptying date, next emptying date, etc. If a building is connected to a sewer network, that information is maintained in the building database. However, this module does not include a separate feature for adding new containments, if new containment must be added, it has to be updated in corresponding building in building database, through BIMS. A containment may be shared by multiple buildings or vice versa.
iii. Service Provider Information Management System (SPIMS): The SPIMS maintains the information related to the sanitation service providers registered with the city that provide emptying services within the city. This information is maintained by municipal authority whereas, two other functionalities employee information and desludging vehicles for service provider to maintain their information about their employees and the desludging vehicles. Only those service providers, employees and vehicles registered in this system are eligible to provide emptying, transporting and disposing faecal sludge in the FSTP or area designated by the municipality. This information helps municipality and service providers for efficient management of the resources and efficient service delivery. The information provided by SPIMS also helps monitoring KPIs set by municipality for service providers and tracking emptying vehicles to ensure that the waste emptied from the containment is transported and disposed in the area designated for disposing waste or FSTP allocated by the municipality.
iv. Treatment Plant Information Management System (TPIMS): The TPIMS maintains the information related to the treatment plants that could be FSTP, Centralized Wastewater Treatment Plant, Decentralized Wastewater Treatment Plant or Co-treatment Plant, those used by the city to dispose and treat collected faecal sludge or wastewater. In addition to this, this sub-module also maintains water sample test data with the standard parameters used for monitoring the performance of the treatment plants in the city.
The information maintained by TPIMS along the information maintained by BIMS and the ESIMS, helps municipal to monitor the CWIS indicators such as (i) FS treatment capacity as a % of total FS generated from non-sewered connections, (ii) FS treatment capacity as a % of volume disposed at the treatment plant, (iii) WW treatment capacity as a % of total WW generated from sewered connections and greywater and supernatant generated from non-sewered connections, and (iv) Effectiveness of FS treatment in meeting prescribed standards for effluent discharge.
v. Emptying Service Information Management System (ESIMS): The Emptying Service IMS digitalizes the sanitation service chain and enables the city to manage the entire sanitation service chain, starting from application requests for emptying service from the customer to the safe disposal of faecal sludge at the treatment plant. All the activities involved in this process can be monitored in real-time through ESIMS. The module is divided into four categories according to the different stages of the sanitation service chain i.e. application, emptying, sludge collection and feedback. The complete service chain is managed and maintained through the application section; however, the individual sections maintain further detailed information. There are several functional modules under this sub-module:
§ Application – this functional module is accessible to helpdesk and FSTP operator. The helpdesk uses it for receiving and maintaining application for customer’s emptying request and collecting and maintain feedback data. FSTP operators use it for updating sludge transferred from the emptied containment and disposed in the FSTP. There is a function to generate reports of emptying service under this functional module. Helpdesks generally are the part of the municipality’s sanitation department, emptier are part of the service providers and FSTP operators can be part of the municipality or the private operator as of municipality’s policy.
§ Emptying – there is an easy-to-use native mobile application (android) that allows collection of the emptying information while providing the emptying service, such that the information can be updated in real-time. The mobile application is used by emptier to collect the information such as emptying start and end time, number of trips, total cost for emptying, and the payment receipt number. Emptying details can be viewed in real-time by the help desk and other municipal staff who have access to this module.
§ Sludge collection – FSTP operator in FSTP updates the FS disposal record that includes date, time and volume of waste disposed in the FSTP through the functional module Application through the web app as the waste is transferred and disposed in FSTP. Help desk can view these records in real-time through this functional module.
§ Feedback – this functional module is accessible to the helpdesk, after completing sanitation service chain from emptying to disposal of the waste in the FSTP.
§ Help desks – this functional module is used to create help desk and update their information. Help desks generally are under municipality itself, but the system has the capability of managing multiple help desks.
Data maintained by FSIMS along with the building data and LIC data enables CWIS Information Management System to generate CWIS indicators such as (i) IHHL onsite sanitation system that have been desludged, (ii) Collected FS disposed at the treatment plant or designated disposal site, (iii) Low income onsite sanitation systems that have been desludged, (iv) FS collected from LIC that is disposed at treatment plant or designated area, (v) Educational institutions where FS generated is safely transported to TP or safely disposed in situ, (vi) Healthcare facilities where FS generated is safely transported to TP or safely disposed in situ, and (vii) Desludging services completed mechanically or semi-mechanically.
The data export tools under FSIMS allow users to export data in CSV, Shape and KML format where applicable.
10.1 FSM Dashboard
· Open the sidebar and click on Fecal Sludge IMS to expand.
· Select the FSM Dashboard.
Overview:
· The FSM Dashboard provides a quick synopsis of the information maintained in this module. The bar charts and pie charts graphically represent various information related to the FSM sub-module.
· The user can interact with the chart’s tools (refer to section 6.8).
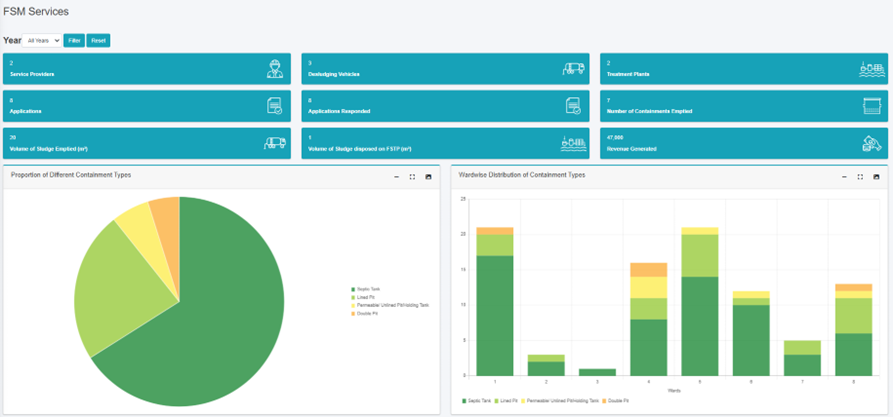
Figure 10- 1 FSM Dashboard
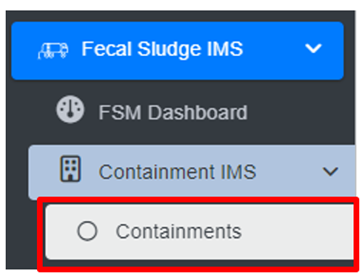
10.2 Containment IMS
The Containment IMS module stores information on containments, buildings connected to them, service history, and other associated data.
· Open the sidebar and click on Fecal Sludge IMS to expand.
· Click on Containment IMS and select Containments.
Overview:
The Containments Page lists all the attribute records stored in the module and provides different Tools, Actions, and Filters that can be used according to the requirements. For more details on Action buttons, review Section 6.
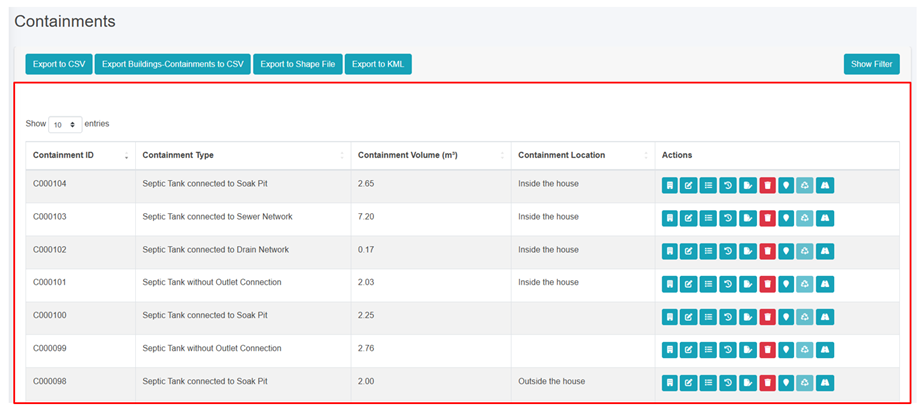
Figure 10- 2 List of Containment
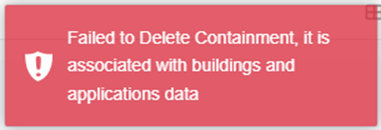
If the user wants to delete the containment data, the user must first remove the connection between the containment and the building then delete the containment accordingly.
10.2.2 View Building Connected to Containment
· Click on the View Building Connected to Containment which redirects to the building connected to the containment page.
· The Building Connected to Containment page will display the building information like BIN, Tax Code/ Holding ID, Structure Type, Estimated Area of the Building, and Functional Use of Building.
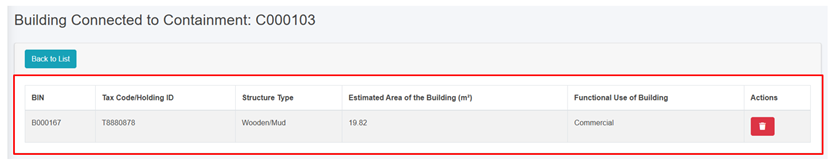
Figure 10- 3 List of Buildings Connected to Containment
Overview:
· By clicking the delete button, the user can disconnect the building from the connected containment but the containment information will remain.
· When user attempts to delete the containment data in which it has the application data then the following criteria must be met:
o If the containment has application data with an "Emptying Status" of False, the connection to the building cannot be deleted.
o If the application data is emptied, meaning the "Emptying Status" is True, the connection between the building and the containment can be deleted and the Sewer Code or Drain Code for that containment will be nullified if the containment has outlet connections.
10.2.3 Containment Type Change History
· Click on the Type Change History button in the Action column.
· This will redirect to the Type Change History page. This page contains detailed information on the changes that have been made to the Containment Type.
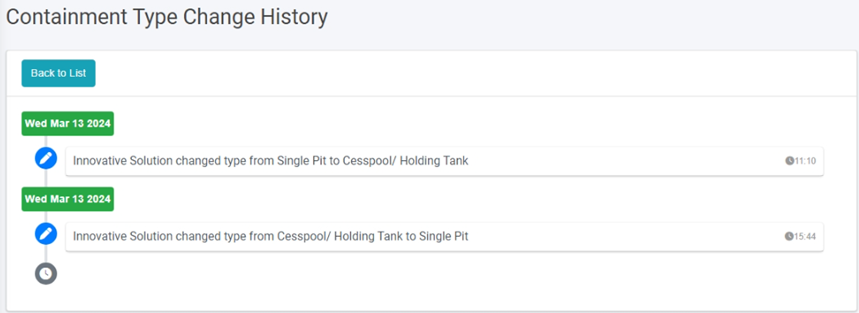
Figure 10- 4 Record of Type Change History
Overview:
· User can view the changes made to the record’s containment type, including the user who made the changes, the edited values and the date of the edits.
Click on Back to List to go back.
10.2.4 Emptying Service History
· Click on the Emptying Service History in the Action button to view the containment emptied history.
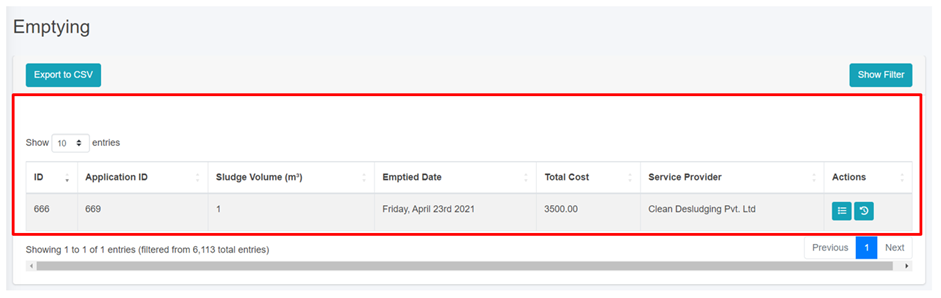
Figure 10- 5 List of Emptying
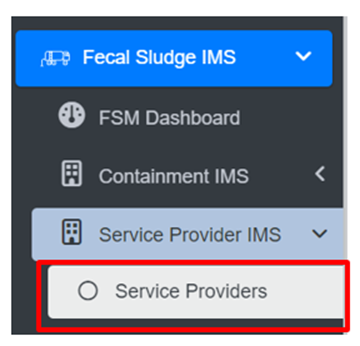
10.3.1 Service Providers
Overview:
· The Service Providers Page lists all the attribute records stored in the module and provides different Filters, Actions, and Tools that can be used according to the requirements. For more details (refer to section 5 Filters, section 6 Actions and section 8 Tools).
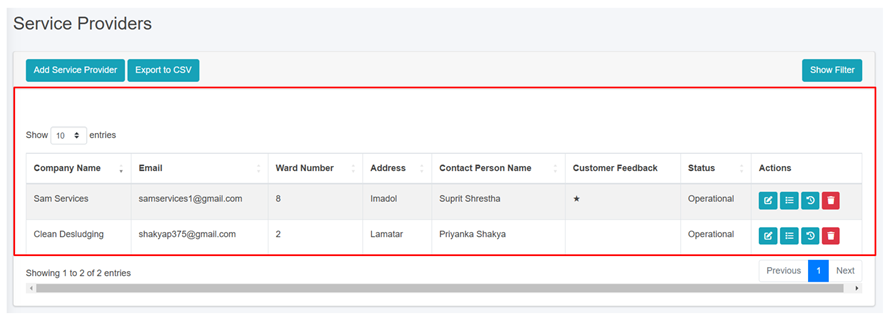
Figure 10- 6 list of Service Providers
b) Add Service Provider
· Click on the Add Service Provider button.
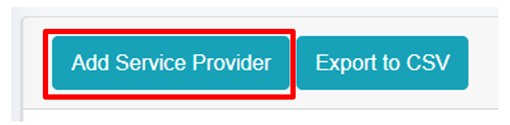
· This redirects to the Add Service Provider form page:
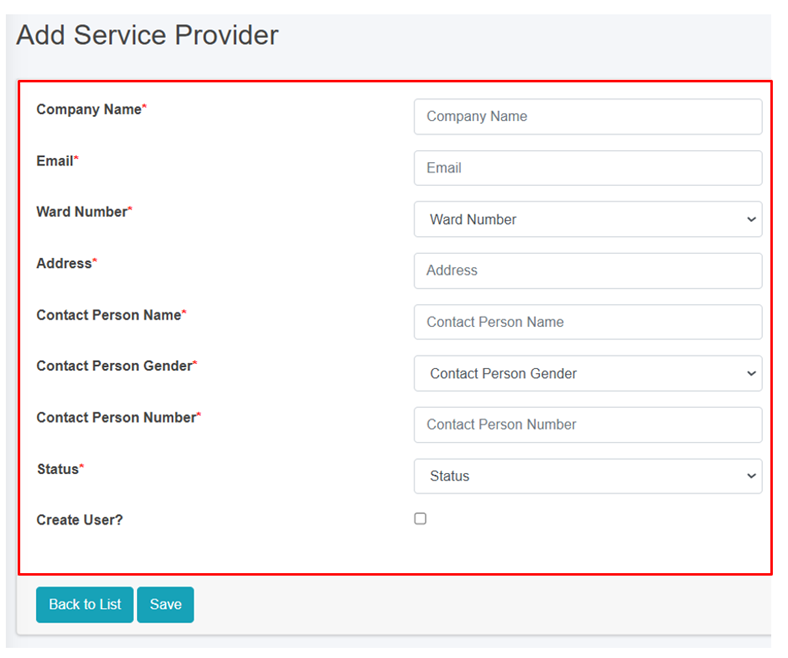
Figure 10- 7 Add new Service Provider
- After filling out the form, click Save and make sure a pop-up message is displayed, refer to section 7.1 Save for more details.
- If a mandatory form field is left out or any form failed validation during the form submission a validation message box will be prompted, refer to section 7.2 Validation Message Box for more details.
Overview:
The Add Service Provider page consists of information that are explained below:
· Company Name – Name of the Service Provider Company.
· Email – Email address of the service provider.
· Ward Number – The ward number where the service provider is located in.
· Address – Address of the service provider.
· Contact Person Name – Name of the company head/ proprietor/ contact person of the service provider.
· Contact Person Gender – Gender of the contact person.
· Contact Person Number – Contact number of the contact person/ service provider office.
· Status - Indicating the operational status of the service provider active or inactive. If the status is set as ‘Inactive’, then the service provider is disabled.
· Create User - If the user chooses to create a new user for the service provider (with Service Provider Admin role), then the user needs to check the Create User option and fill in the "Password" & "Confirm Password" fields, which will allow the user to log in. However, if a user doesn't select the "Create User" option, the password fields won't be visible, and the service provider user will not be created.
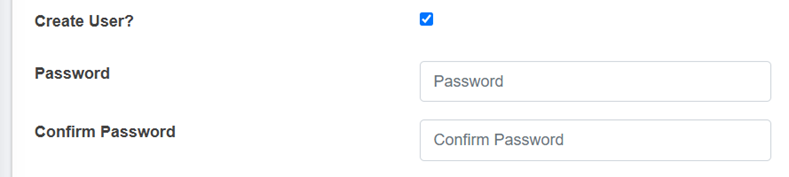
- Password: Password for the new service provider.
- Confirm Password: Confirm the password for the new service provider.
Note:
- The deletion of service provider data is not permitted, where its data is connected to any application, Desludging vehicles, Employee Information and the associated user. The user is only allowed to set to non-operational.
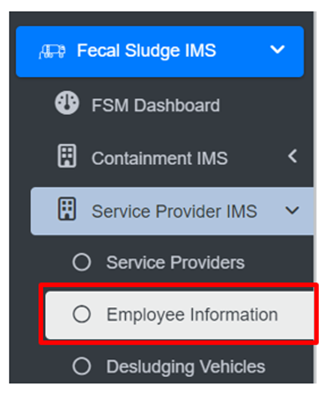
10.3.2 Employee Information
The Employee Information module maintains information related to the employees of the service providers.
• Open the sidebar and click on Fecal Sludge IMS to expand.
• Now, click on Service Provider IMS and select Employee Information.
Overview:
The Employee Information Page lists all the attribute records stored in the module and provides different Filters, Actions, and Tools that can be used according to the requirements. For more details (refer to section 5 Filters, section 6 Actions and section 8 Tools).
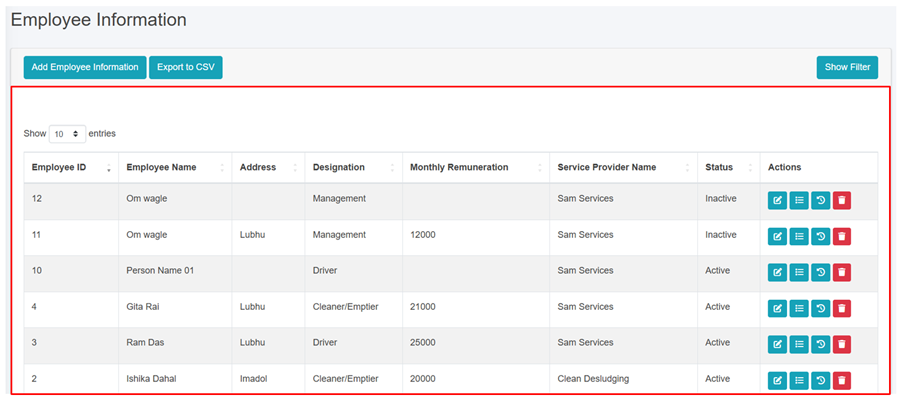
Figure 10- 8 List of Employee Information
b) Add Employee Information
· Click on the ‘Add Employee Information’ button.
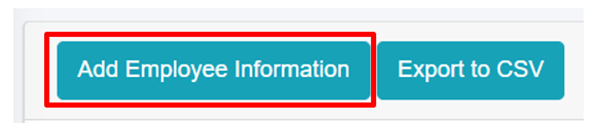
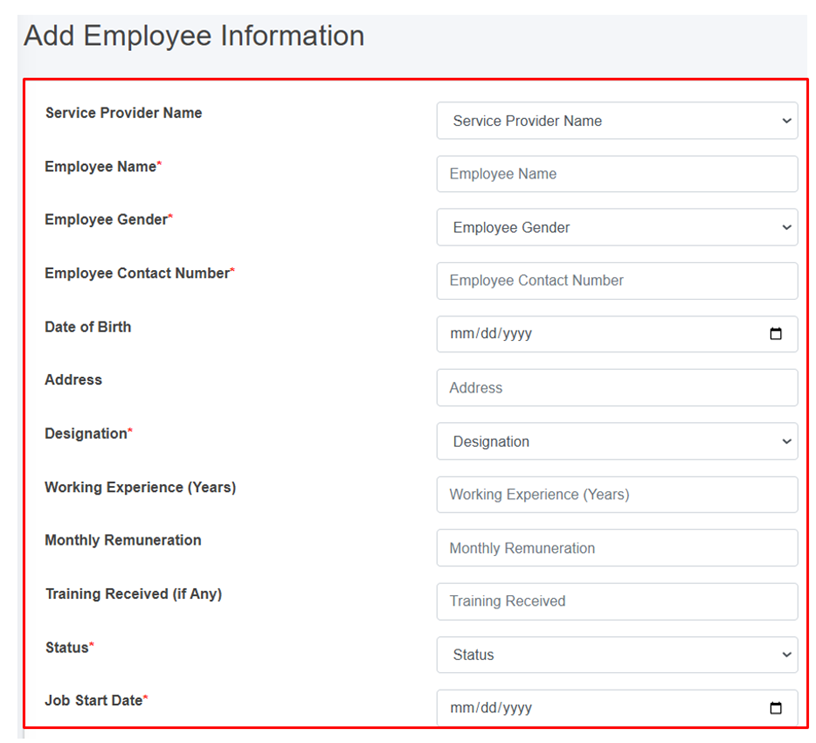
Figure 10- 9 Add Employee Information
- After filling out the form, click Save and make sure a pop-up message is displayed, refer to section 7.1 Save for more details.
- If a mandatory form field is left out or any form failed validation during the form submission a validation message box will be prompted, refer to section 7.2 Validation Message Box for more details.
Overview:
The add employee information form fields are explained below:
· Service Provider Name: Name of the service provider selected from list of pre-registered service providers. The dropdown menu for selecting the Service Provider name displays the names that are maintained in the Service Providers sub-module of the Service Provider IMS module. If the Service Provider’s Status is Non-operational in the Service Provider IMS module, they won’t be included in the list.
· Employee Name: Name of the employee.
· Employee Gender: Gender of the employee.
· Employee Contact Number - Contact Number of the employee.
· Date of Birth - Date of birth of the employee.
· Address - Address of the employee.
· Designation: Designation of employee.
o If the user selects “Driver” as the designation, two additional fields will be displayed.
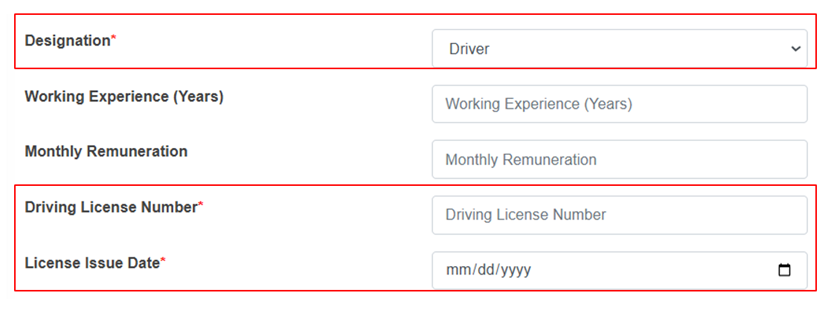
o Driving license Number – Unique identification number of the employee’s driving license.
o License Issue Date – The date on which the driving license was issued.
· Working Experience (Years) - Number of years of working experience of the employees.
· Monthly Remuneration - Monthly wage of the employee.
· Training Received (if Any) - Any trainings the employee has completed.
· Status: Indicates the operational status of the employee, active or inactive. If the status is set as ‘Inactive’, then the employee’s account is disabled.
· Job Start Date: Start date of the employee's employment.
Job End Date: End date of the employee's employment. (The Job End Date field is displayed if the status is inactive.)
Note:
- Deletion of employee information is not allowed if is associated with the ongoing emptying process.
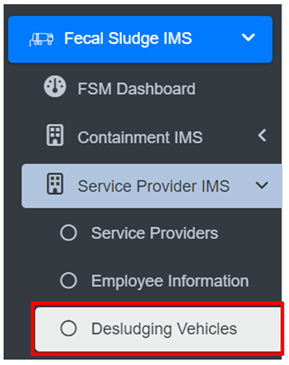
10.3.3 Desludging Vehicles
A desludging vehicles sub-module maintains information related to a desludging vehicle also known as a sludge removal truck or a vacuum truck. It also maintains related information such as removing sludge and other waste materials from various sources.
· Open the sidebar and click on Fecal Sludge IMS to expand.
· Now, click on Service Provider IMS and select Desludging Vehicles.
Overview:
The Desludging Vehicles Page lists the records stored in the module and provides different Filters, Actions, and Tools that can be used according to the requirements. For more details (refer to section 5 Filters, section 6 Actions and section 8 Tools).
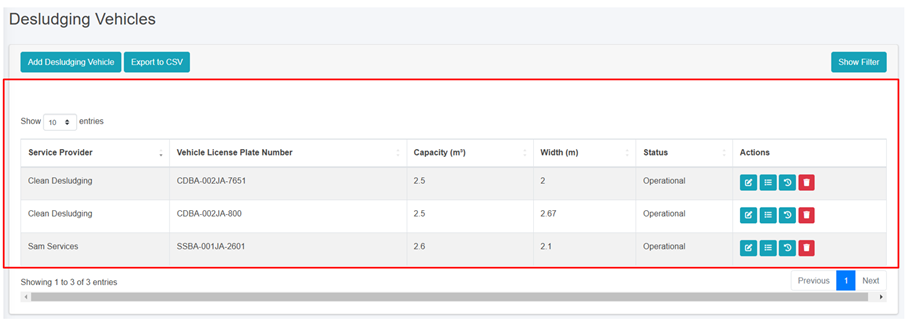
Figure 10- 10 List of Desludging Vehicles
b) Add Desludging Vehicle
· Click on “Add Desludging Vehicle” button.
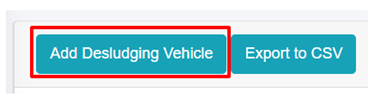
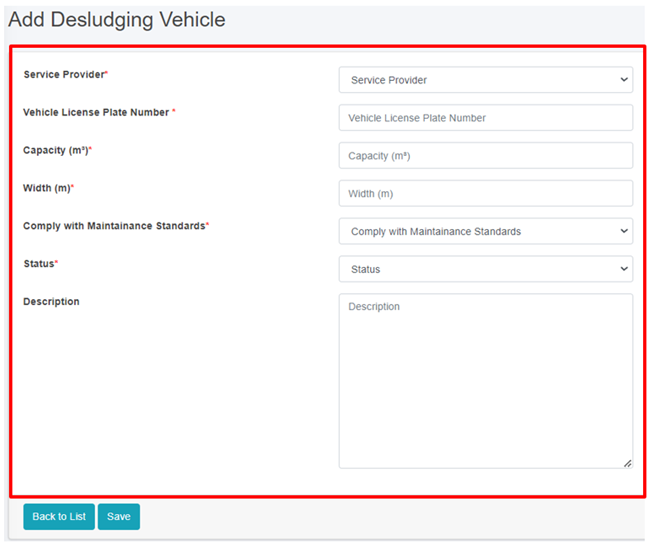
Figure 10- 10 Add Desludging Vehicle
• After filling out the form, click Save and make sure a pop-up message is displayed, refer to section 7.1 Save for more details.
• If a mandatory form field is left out or any form failed validation during the form submission a validation message box will be prompted, refer to section 7.2 Validation Message Box for more details.
Overview:
The Add Desludging Vehicle page consists of information that are explained below:
• Service Provider - Name of the operational service provider selected from the list of pre-registered service providers.
• Vehicle License Plate Number - The license plate number of the desludging vehicle.
• Capacity (m3) - The capacity of the desludging vehicle in cubic meters.
• Width (m) - The width of the desludging vehicle in meters.
• Comply with Maintenance Standards: Ensuring that the vehicles are regularly inspected, serviced, and repaired as needed to maintain their operational efficiency, safety, and compliance with regulatory requirements.
• Status - Indicating the operational status of the Desludging Vehicles. If the status is set as non-operational, then the desludging vehicles is disabled.
• Description- A description of the desludging vehicle.
Note:
• If the desludging vehicles is present in any of the emptying, then the deletion is not allowed, only the user is permitted to set its data to non-operational.
10.4 Treatment Plant IMS
10.4.1 Treatment Plants
Treatment Plants sub-module of Fecal Sludge IMS maintains information of different treatment plants that either treats wastewater collected and conveyed by sewer network or fecal sludge which are emptied and transported from containments mechanically.
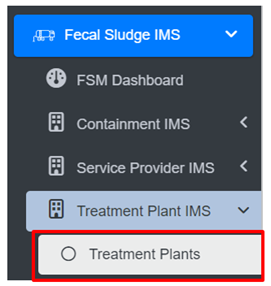
· Open the sidebar and click on Fecal Sludge IMS to expand.
· Now, click on Treatment Plant IMS and select Treatment Plants.
Overview:
The Treatment Plants page lists the records stored in the module and provide different Filters, Actions and Tools that can be used according to the requirements. For more details (refer to section 5 Filters, section 6 Actions and section 8 Tools).
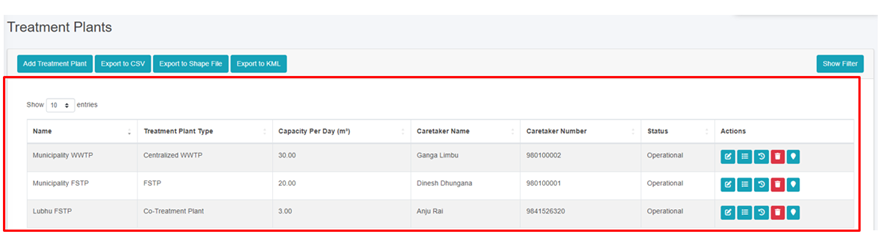
Figure 10- 11 List of Treatment Plant
b) Add Treatment Plant
· Click on ‘Add Treatment Plant’ button.

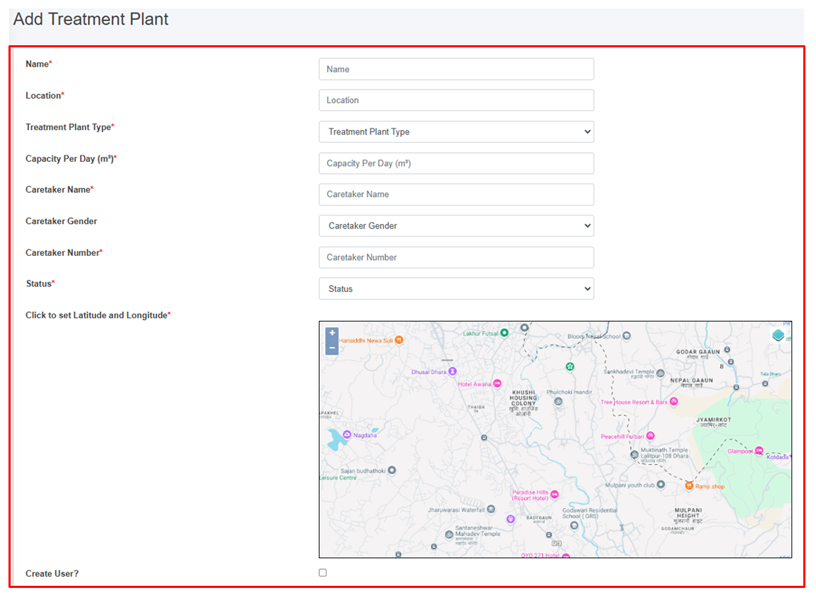
Figure 10- 12 Add Treatment Plant
- After filling out the form, click Save and make sure a pop-up message is displayed, refer to section 7.1 Save for more details.
- If a mandatory form field is left out or any form failed validation during the form submission a validation message box will be prompted, refer to section 7.2 Validation Message Box for more details.
Overview:
The add new treatment plants page consists of different form fields that capture different information which are explained below:
· Name - Name of the treatment plant.
· Location- Location of the treatment plant where it is situated.
· Capacity per Day (m3) - Total capacity per day of the treatment plant to treat sludge. (it takes numeric value only)
· Treatment Plant Type - The type of the treatment plant designed to treat either wastewater or fecal sludge.
o FSTP – Fecal sludge treatment plant.
o Centralized WWTP - Centralized waste water treatment plant.
o Decentralized WWTP – Decentralized waste water treatment plant.
o Co- Treatment Plant - Treatment plants where wastewater and fecal sludge are treated together by the sanitation expert.
· Caretaker Name - Name of the caretaker of the treatment plant.
· Caretaker Gender – Gender of the Caretaker.
· Caretaker Number - Contact number of the Caretaker (It takes numeric values only).
· Status - Status of the treatment plant that is operational or non-operational.
· Click to set Latitude and Longitude - Find the treatment plant location on the map and pin a marker on the map by clicking on that location. This will mark the spatial location of the treatment plant in the map with latitude and longitude.
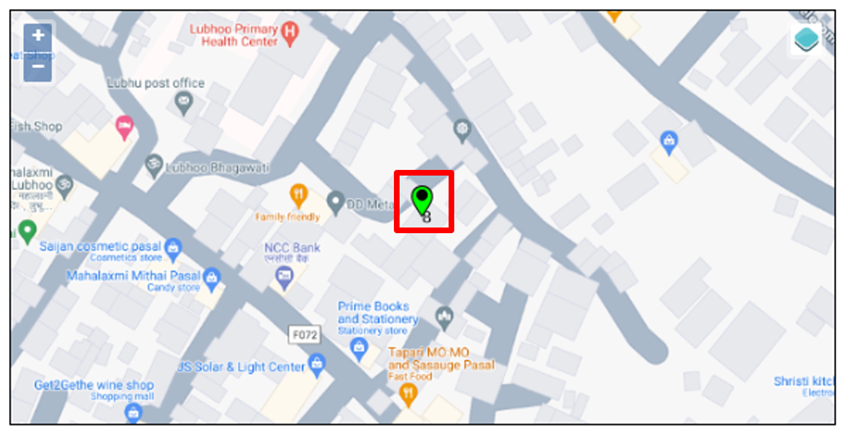
Figure 10- 13 Pinned Location of new treatment plant
· Create user? - If the user chooses to create a new user for the Treatment plant (with Treatment Plant Admin role), then the user needs to check the Create User option and fill in the "Password" & "Confirm Password" fields, which will allow the user to log in.
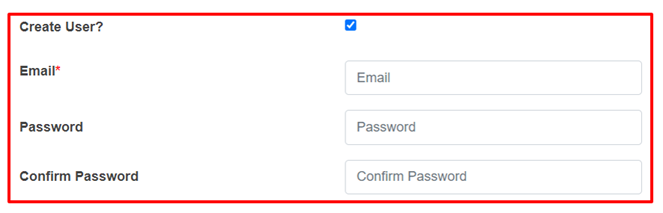
Figure 10 - 14 Create new user
· Email- Email of the user to log into the system.
· Password- Password of the user to log into the system (The password must contain one uppercase, one lowercase and must contain at least one symbol)
- Confirm Password: Enter the exact entered password again.
Note:
Deletion of treatment plant data is not allowed if any of the following conditions are met:
· The treatment plant has associated emptying records, only the its status can be set to non-operational.
· The treatment plant has associated performance efficiency test records.
· The treatment plant has associated users.
When the deletion is allowed, the associated sewers or drains linked to the Treatment Plant ID are nullified.
10.5 Performance Efficiency Standards
The Performance Efficiency Standards Sub-module basically set the parameters of standards for the module that is Performance Efficiency Test at the start when interacted with the web-application
• Open the sidebar and click on Fecal Sludge IMS to expand.
• Now, click on Treatment Plant IMS and select Performance Efficiency Standards.

Overview:
The Performance Efficiency Standards Page displays the overall parameters maintained by the sub-module.
· The user can Edit the Performance Efficiency Standard, click on the Edit button

Figure 10- 16 Edit Performance Efficiency Standard Page
- After Editing is completed, click Save and make sure a message is displayed, refer to section 7.1 Save for more details.
The fields that are displayed while editing the form are mentioned below:
· TSS Standard (mg/I) - Total suspended solids (TSS) Standard Value (mg/l).
· ECOLI Standard (CFU/100 mL) - ECOLI Standard (CFU/100 mL).
· pH Minimum - Minimum pH value.
· pH Maximum - Maximum pH value.
· BOD Standard (mg/l) - Biochemical oxygen demand (BOD) standard (mg/l).
Note:
- The Above mentioned fields only takes the numeric values.
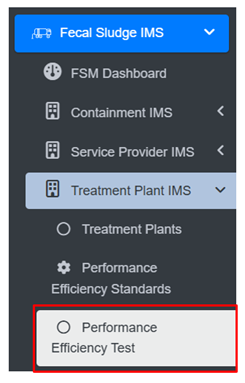
10.5.2 Performance Efficiency Test
Performance Efficiency Test sub-module involves a comprehensive evaluation of the treatment plant’s operational effectiveness on removal of pollutants either from wastewater or fecal sludge.
· Open the sidebar and click on the ‘Fecal Sludge IMS’.
· Now, click on ‘Treatment Plant IMS’ and select ‘Performance Efficiency Test’.
Overview:
· The user can see the lists of the performance efficiency test conducted on wastewater or fecal sludge treatment plants and provides different Filter, Actions and Tools that can be used according to the requirements. For more details (refer to section 5 Filters, section 6 Actions and section 8 Tools).
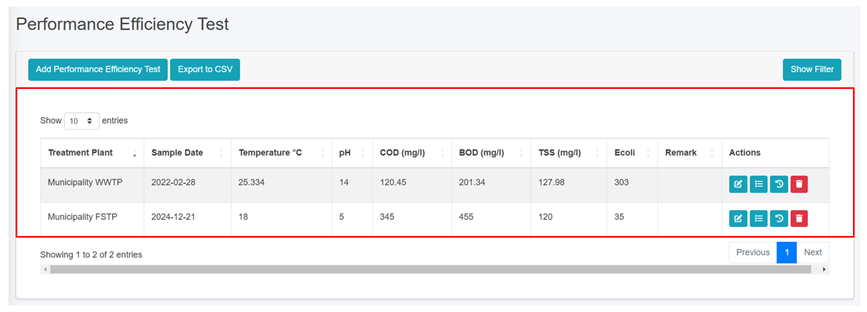
Figure 10 - 17 List of Performance Efficiency Test
b) Add Performance Efficiency Test
· Click on ‘Add Performance Efficiency Test’ button.
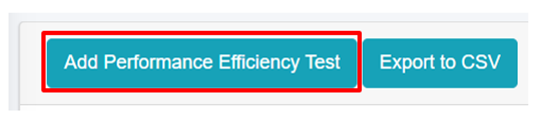
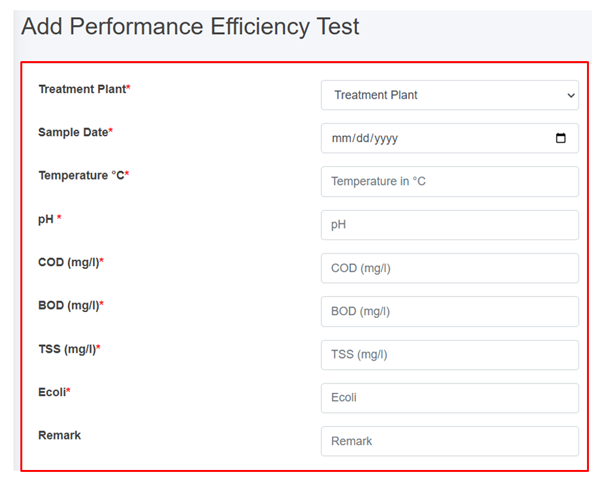
Figure 10- 18 Add performance Efficiency Test
· After filling out the form, click Save and make sure a pop-up message is displayed, refer to section 7.1 Save for more details.
- If a mandatory form field is left out or any form failed validation during the form submission a validation message box will be prompted, refer to section 7.2 Validation Message Box for more details.
Overview:
The fields of the performance efficiency test form are explained below:
· Treatment Plant- Name of the treatment plant for which the test has been carried out.
· Sample Date- The date on which the test is conducted (It must be before or equal to the current date).
· Temperature °C- Temperature of the wastewater sample at the time of testing (It takes numeric values only).
· pH- The pH value of the sample. It reveals the acidity or basicity of the wastewater sample, expressed on a scale ranging from 0 (highly acidic) to 14 (highly basic), it takes numeric values only ranging between 0-14.
· COD (mg/l)- The Chemical Oxygen Demand (COD) value of the sample. Chemical oxygen demand indicates the amount of oxygen required to break down organic matter in the wastewater (It takes numeric values only).
· BOD (mg/l)- The Biochemical Oxygen Demand (BOD) value of the sample. Biochemical oxygen demand indicates the amount of oxygen consumed by microorganisms as they decompose organic matter in the wastewater (It takes numeric values only).
· TSS (mg/l)- The Total Suspended Solids (TSS) value of the sample. Total Suspended Solids indicates the amount of solid material suspended in the wastewater sample (It takes numeric values only).
· Ecoli- Number of Ecoli present in the sample (It takes numeric values only).
- Remark- Additional notes or observations about the performance efficiency test.
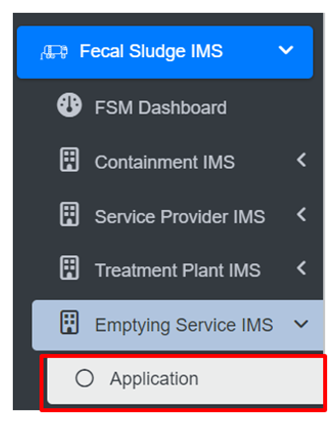
10.6 Emptying Service IMS
Emptying Service IMS includes the sub-modules which allows the management and monitoring of the sanitation value chain. This sub-module includes Applications, Emptying, Sludge Collection, Feedback, and Help Desk, which are the primary components of the sanitation value chain.
10.6.1 Application
The Application sub-module is responsible for managing information related to submitted Emptying Service Applications. It stores data of applications received through the help desk that require emptying, and applications that have already been serviced. The Applications page serves as a central hub for all service delivery processes, as it contains all components of the service delivery chain.
On the Applications page, user can access the status of an application through four different Stages: Application, Emptying Status, Sludge Collection Status and Feedback Status. By clicking on the corresponding button next to the check mark, user can view the emptying information or sludge collection or feedback related to a particular application. User can edit the emptying details, sludge collection details and feedback details at certain stages of the application process.
· Open the sidebar and click on Fecal Sludge IMS to expand.
· Now, click on the Emptying Service IMS and select Application.
• On the application page, the data such as Employee information, Desludging vehicle, and Emptying Service IMS are only visible according to the assignment of the service provider and its disposal place, where service provider1 can only view the details related to the service provider1. This page provides different Filter, Actions and Tools that can be used according to the requirements. For more details (refer to section 5 Filters, section 6 Actions , section 8 Tools and section 10.2.4 Emptying Service History).
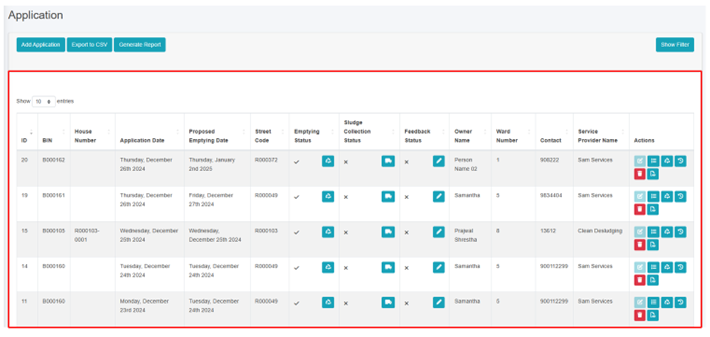
Figure 10- 19 List of Application
b) Generate Report
Generate Report tool produces the report in a PDF format monthly. Here the reports consist of different information such as: Operator name from where the containments are emptied, number of containments that is cleaned, total volume of sludge collected, number of applications who received the service and the total cost that is incurred during the sludge collection process. It also consists of ward wise cumulative data that of selected month displaying the ward no, containments emptied, application received, sludge collection and total cost.
· Click on ‘Generate Report’.
· Select the month and year field from dropdown.
· Click on ‘Export to PDF’ button to get the data based on the desired selections.

Figure 10- 20 Generate Report
Overview:
- User can download a report in PDF format, as shown below:
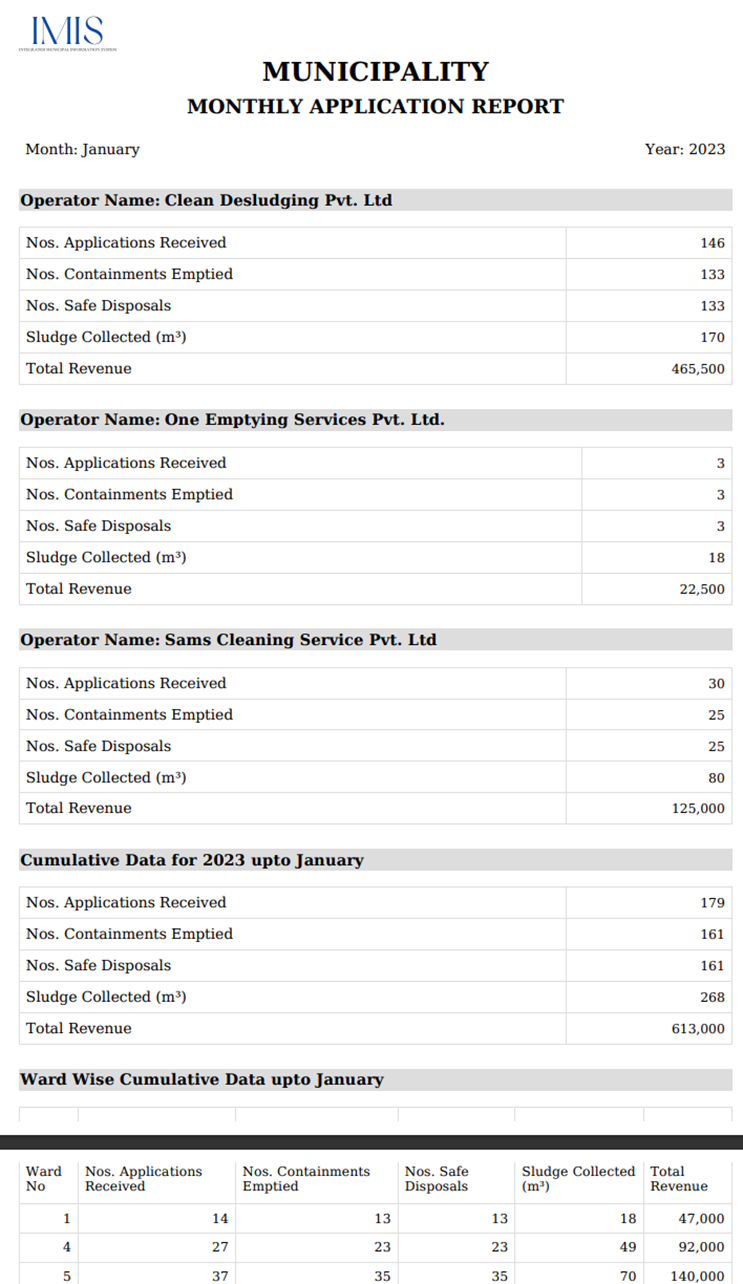
Figure 10- 21 Overview of Generated Report
c) Add Application
· Click on the ‘Add Application’ button.
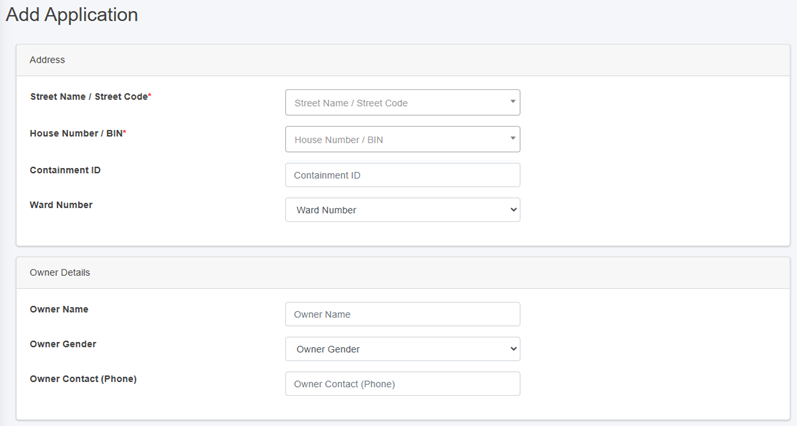
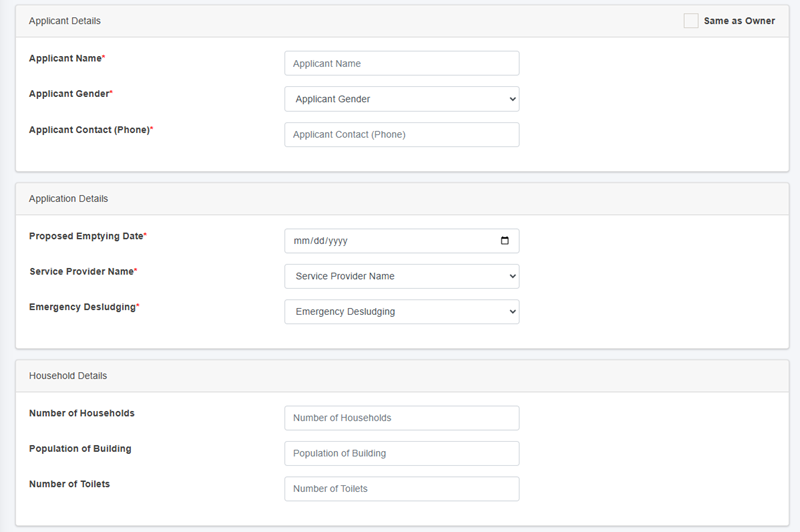
Figure 10- 22 Add Application Form
• After filling out the form, click Save and make sure a pop-up message is displayed, refer to section 7.1 for more details.
• If a mandatory form field is left out or any form failed validation during the form submission a validation message box will be prompted, refer to section 7.2 Validation Message Box for more details.
Overview:
The form fields of the application are explained below:
Address
· Street Name - Identifier for the road the building is connected to. The unique identifier of the building where the containment is located. User can also search for the street code or name using the street name or its code.
· House Number / BIN - The unique identifier of the building where the septic tank is located. Additionally, user can perform searches for the containment id using the house number or BIN.
· Containment ID - The selected House Number / BIN containment ID is displayed here. This field is read-only if only one containment is connected to the building. If there is more than one, a dropdown menu listing the containments connected to the building will appear. If the user selects a containment that is currently active, the application cannot be created until the active containment has been emptied.
· Ward Number - Identifier for the local administrative unit the building/ containment is located.
Owner Details
When House Number / Bin is selected, the owner details are automatically filled and cannot be edited.
· Owner Name - Name of the owner of the building where emptying service is required.
· Owner Gender - The gender of the owner.
· Owner Contact (Phone) - The contact number of the owner, it takes numeric values only.
Applicant Details
· If the applicant is the same as the house owner, select Same as Owner “Checkbox” which will auto-fill the owner’s details as the application details as well, indicating that the applicant is the house owner.
· Applicant Name - The name of the applicant who lodged the application for the emptying service, can be the same as owner.
· Applicant Gender - The gender of the applicant.
· Applicant Contact (Phone) - The contact number of the applicant, takes numeric values only.
· Proposed Emptying Date - The date when the septic tank is proposed to be emptied, only a future date is allowed to be selected.
· Service Provider Name - Identifier for the service provider assigned to provide the emptying service.
· Emergency Desludging - Indicating whether the desludging has a high priority.
Households Details
When the user selects the House Number / Bin, the Household Details section is automatically filled. These fields cannot be edited once the form is submitted, as outlined below:
o Number of Households – The total number of households served.
o Population of Building – The number of population served.
-
-
-
- Number of Toilets – The total number of toilets.
-
-
d) Actions
i. Add Emptying Service Details
• Click on the ‘Add Emptying Service Details’ button.

• This redirects to the Add Emptying Service Details page.
Overview:
· Emptying Information is collected from the mobile app which is the updated in the web application in the application sub-module. This information can also be collected through the web application interface as well, but the use of the mobile application is recommended.
· Refer to the Emptying Information Collection Mobile App User Manual for collecting the emptying information.
· The application must process through each stage in a serial manner. First, only the emptying service details form is enabled, leaving the other two form that is sludge collection status and feedback status disabled. When the user fill in the first form (Emptying details) and submit it, only then the second-page sludge collection status page is enabled and the for the third form page, when the user fill the second form it will be enabled.
· The Edit form/ view details page is prompted only after emptying details are filled and once the application is completed to the final stage the edit button will be disabled.
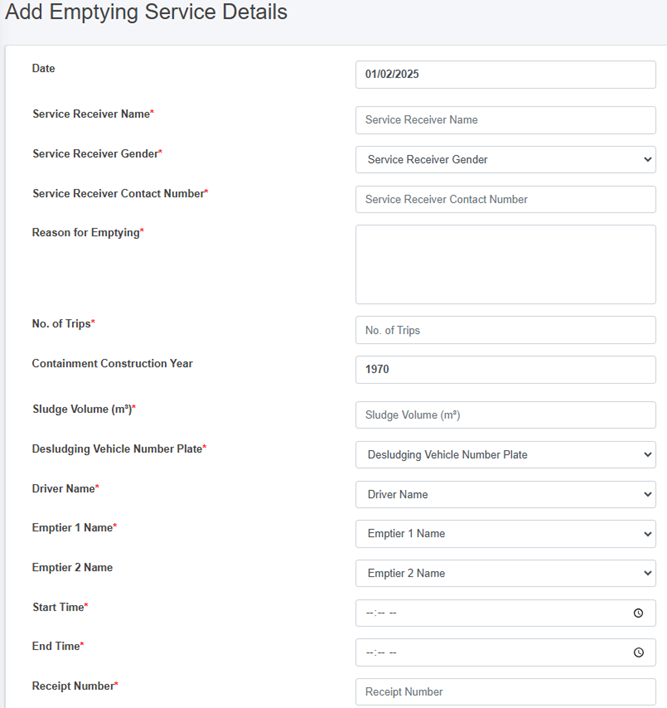
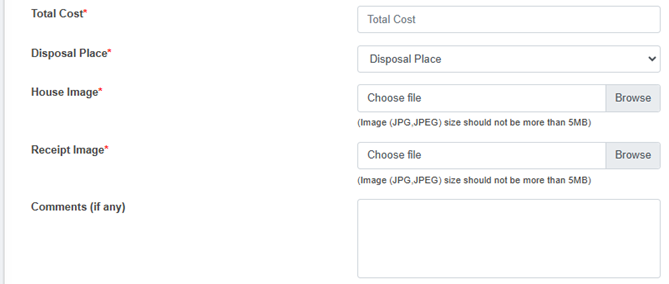
Figure 10- 23 Add Emptying Service Details Form
• After filling out the form, click Save and make sure a pop-up message is displayed, refer to section 7.1 Save for more details.
• If a mandatory form field is left out or any form failed validation during the form submission a validation message box will be prompted, refer to section 7.2 Validation Message Box for more details.
Overview:
The emptying service details can be obtained from mobile as well as from the web. The form fields from the web are explained below:
· Date - The date is auto-filled.
· Service Receiver Name - Name of the person present at the time of emptying.
· Service Receiver Gender - Gender of the person present at the time of emptying.
· Service Receiver Contact Number - Contact Number of the person present at the time of emptying (This field only allows the numeric values).
· Reason for Emptying - The reason for emptying the containment.
· No. of Trips – The number of the trips require to complete the emptying process. (Its value should be at least “1”)
· Containment Construction Year - The year the containment was constructed; this field is auto-filled.
· Sludge Volume(m3) - The volume of sludge (m3) that has been emptied from the containment. (the volume of sludge to be emptied must be less than the containment size)
· Desludging Vehicle Number Plate - The number plate of the desludging vehicle used for emptying. The user must select a vehicle number plate from the list of operational vehicles registered under the chosen service provider.
· Disposal Place - Name of the Treatment Plant where collected sludge will be disposed.
· Driver Name - Name of the desludging vehicle operator of the assigned service provider.
· Emptier 1 Name - Name of the cleaner/emptier employee.
· Emptier 2 Name - Name of the cleaner/emptier employee
· Start time - The start time of the emptying process.
· End Time - The end time of the emptying process (The End time must be after the Start time)
· Receipt Number - Receipt number that is generated after the emptying process is completed.
· Total Cost - The total cost of the emptying process (This field only allows numeric values).
· House Image - Image of the building from where the sludge was emptied.
· Receipt Image - Image of the receipt generated after the emptying process.
· Comments (if any) - Comments from operation, if any.
Note:
- For House and Receipt Image - The user can select the image to fill the field (The image type should be JPEG or JPG with size of less than 5 MB).
- If the house image is uploaded during the add building process, it will not be displayed. However, if it not uploaded, the field will be displayed.
ii. Add Sludge Collection Details
· Click on the ‘Sludge Collection Details’ button.

• This redirects to the Add Sludge Collection page
· The Sludge Collection button is only enabled after the emptying details is filled.
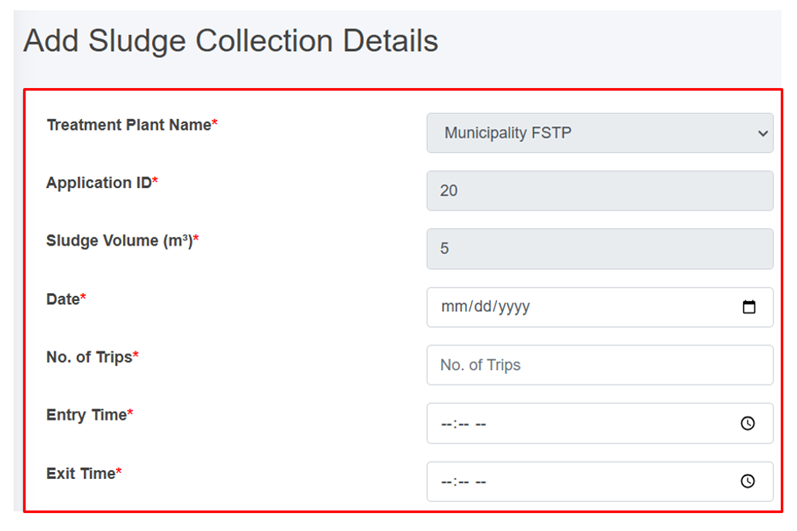
Figure 10- 24 Add Sludge Collection Details Form
- After filling out the form, click Save and make sure a pop-up message is displayed, refer to section 7.1 Save for more details.
- If a mandatory form field is left out or any form failed validation during the form submission a validation message box will be prompted, refer to section 7.2 Validation Message Box for more details.
Overview:
The Sludge Collection details form fields are explained below:
· Treatment plant - Name of the treatment plant where the sludge will be disposed (This field is auto-filled.
· Application ID - A unique identifier for the application submitted by the customer. (This field is auto-filed)
· Sludge Volume (m³) - Volume of sludge (m3) disposed. (This field is auto-filled)
· Date: Date of the sludge disposal (Selected date cannot be before the present date).
· No. of Trips – The number of trips require to complete the sludge collection. (Its value must at least “1”)
· Entry Time - Entry time of a vehicle to FSTP from the sludge collection.
- Exit Time - Exit time of a vehicle to FSTP from the sludge collection site (The exit time should be after the Entry Time).
iii. Add Feedback Details
· Click on the ‘Feedback details’ button.

- This redirects to the Feedback Details page.
- The feedback button is only enabled after filling the emptying service details. Once the user submits the feedback, it can only be view.
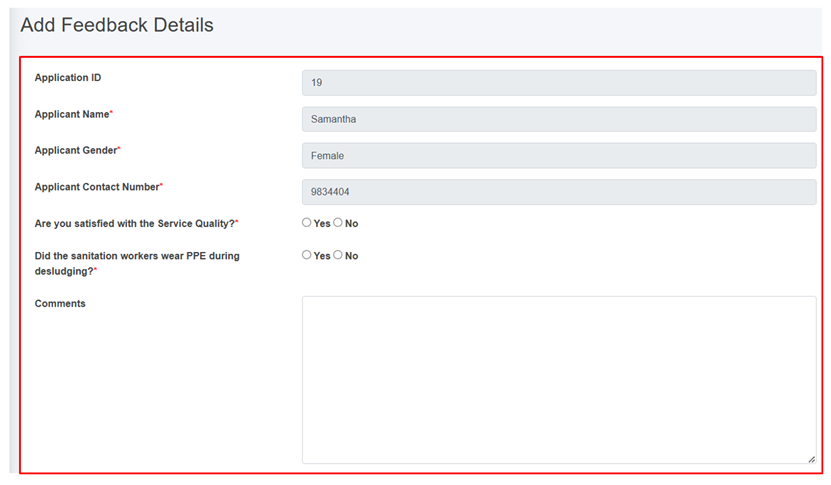
Figure 10- 25 Add Feedback Details Form
- After filling out the form, click Save and make sure a green pop-up message is displayed, refer to section 7.1 Save for more details.
- If a mandatory form field is left out or any form failed validation during the form submission a validation message box will be prompted, refer to section 7.2 Validation Message Box for more details.
Overview:
The feedback form contains different fields which are explained below:
· Application ID: A unique identifier for the application submitted by the customer. (This field is auto-filled)
· Applicant Name: The name of the customer who submitted the feedback. (This field is auto-filled)
· Applicant Gender: The gender of the customer who submitted the feedback. (This field is auto-filled)
· Applicant Contact Number: The contact number of the customer who submitted the feedback. (This field is auto-filled)
· Are you satisfied with the Service Quality?: Indication of whether the customer is satisfied with the Service Quality.
· Did the sanitation workers wear PPE during desludging?: Indication of whether the service provider is wearing Personal Protective Equipment (PPE).
- Comments: Place for the customer to share their thoughts, opinions, or feedback on the service.
iv. Generate Report
Generate report button is activated once the emptying form is filled. Generated report button can be accessed from the Action Column of the Application page. Clicking on the Generate report button generates a PDF report reflecting the current status of the application p to the point it has reached.
· Click on the ‘Generate Report’ button.

- This redirects to the Report page.
Overview:
The user can view the detailed report that has been generated for the selected application.
· After clicking the Generate Report, user is able to download the pdf report for each application.
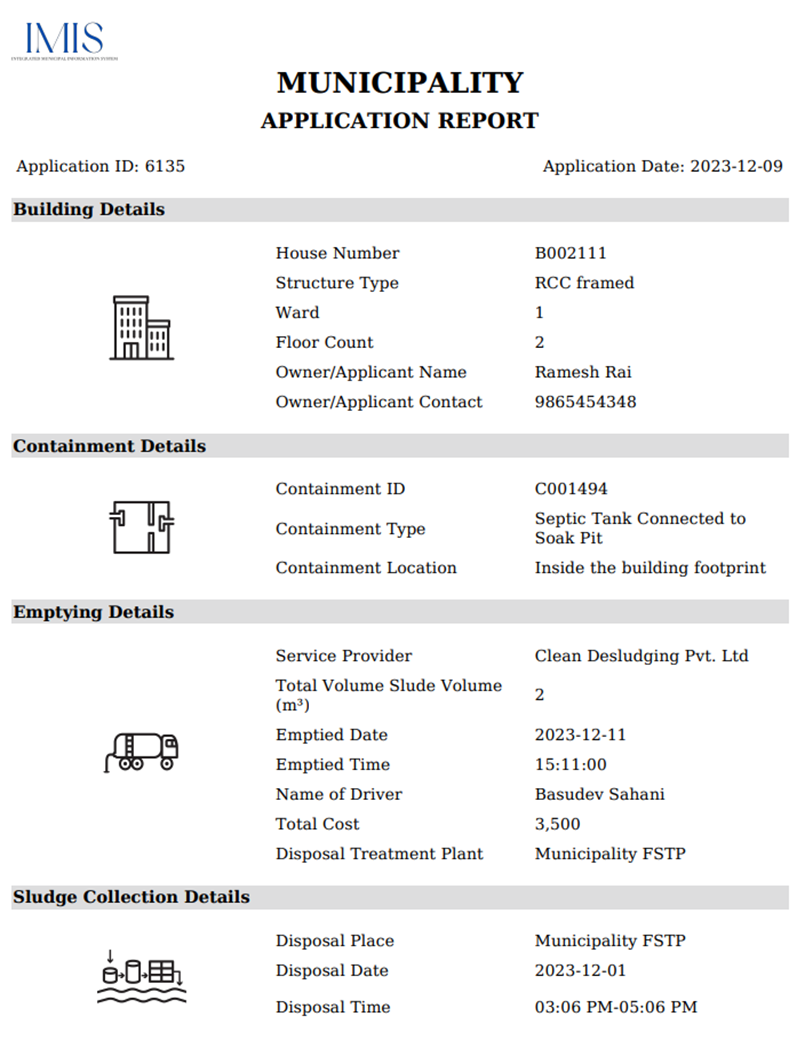
Figure 10- 26 Report generated of a particular application
· The top most part of the pdf contains the applicant’s property details. This includes key details such as the house number, structure type, ward, floor count as well as the owner/ applicant name and contact information.
- The middle section contains the containment and emptying details. The containment details encompass the containment id, type and location. The emptying details include the service provider, total volume of sludge, emptied date, driver’ name, total cost and the disposal treatment plant information.
· The bottom section contains the specifics concerning the sludge collection. It includes disposal place, date and time.
Note:
Deletion of Application data is not permitted when it is associated with emptying data.
10.6.2 Emptying
The Emptying sub-module maintains the information about the emptying history of the containments. It contains information regarding the emptying of the containment.
• Open the sidebar and click on ‘Fecal Sludge IMS’ to expand.
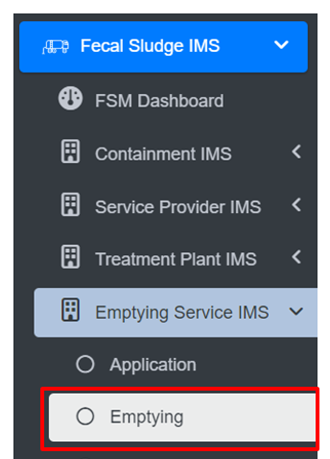
• Now, click on the ‘Emptying Service IMS’ and select ‘Emptying’.
• This redirects to the Emptying page.
Overview:
· User can see the list of emptied containments in the emptying page.
· The Emptying page is to view, export and filter the data that is updated through the application page.

Figure 10- 27 List of Emptied Containments
· To add the emptying service status, navigate to the Application page and click on the Add Emptying Service Details button (refer to section 10.6.1.d. i Add Emptying Service Details).
· View the detailed information on the Emptying (refer to section 6.5 Show Details of Record).
· Check the history of the record (refer to section 6.2 View History).
· Export data (refer to chapter 8 Tools) and filter data (refer to chapter 5 Filters).
Note:
- Deletion of Emptying data is not permitted when it is associated with sludge collection data.
- Deletion of Emptying data is not permitted when it is associated with feedback data.
- If Emptying has been submitted 24 hours ago and the user is not super-admin or sanitation department then deletion is not permitted.
10.6.3 Sludge Collections
The Sludge Collection sub-module maintains the information related to the sludge collection at the treatment plant.
· Open the sidebar and click on ‘Fecal Sludge IMS’ to expand.
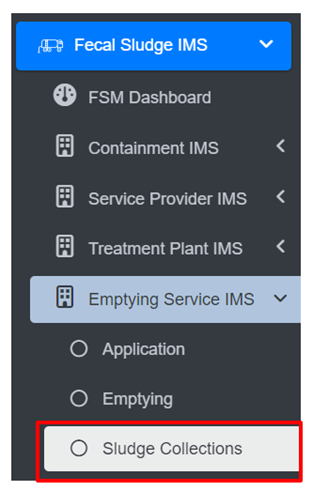
· Now, click on the ‘Emptying Service IMS’ and select Sludge Collections.
- This redirects to the Sludge Collections page.
Overview:
· User can view the lists of sludge collected from the treatment plant.
· The Sludge Collections page is to view, export and filter the data that is updated through the application page.
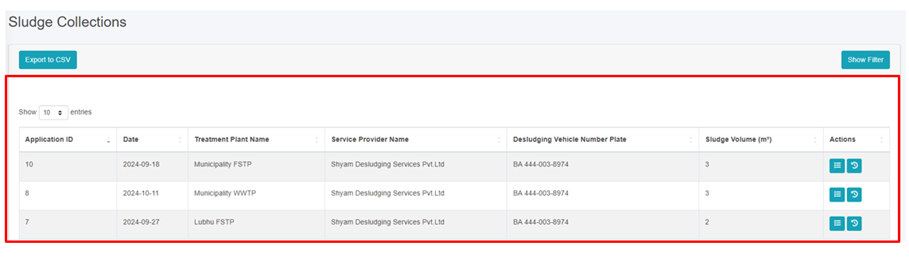
Figure 10- 28 List of Sludge Collection
· To add the sludge collection status, navigate to the Application page and click on the Add Sludge Collection Details button (refer to section 10.6.1 d ii Add Sludge Collection Details).
· View the detailed information of the Sludge Collection (refer to section 6.5 Show Details of Record).
· Check the history of the record (refer to section 6.2 View History).
· Export data (refer to chapter 8 Tools) and filter data (refer to chapter 5 Filters).
Note:
- If the creation date of the sludge record is more than 24 hours prior to the current date, deletion is permissible. The same criteria apply to editing records. If this condition is not met, only individuals with superadmin and the Sanitation Department are authorized to delete the records.
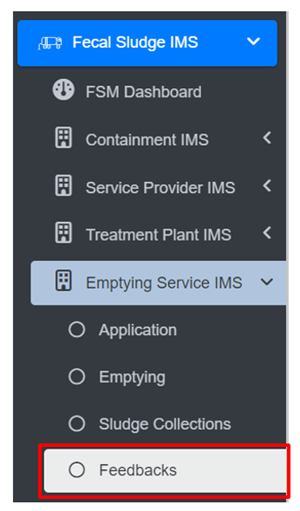
10.6.4 Feedbacks
The Feedback History sub-module maintains the information regarding a list of feedback collected.
· Open the sidebar and click on ‘Fecal Sludge IMS’ to expand.
· Now, click on the Emptying Service IMS and select Feedbacks.
· To add the feedback, navigate to the Application page and click on the Add Feedback Details button (refer to section 10.6.1 d iii Add Feedback Details).
· View the detailed information of the Feedback (refer to section 6.5 Show Details of Record).
· Check the history of the record (refer to section 6.2 View History).
- Export data (refer to chapter 8 Tools) and filter data (refer to chapter 5 Filters).
Overview:
· User can view the lists of Feedback which is collected from the applicants.
· The Feedback page is to view and export the data that is updated through the application page.
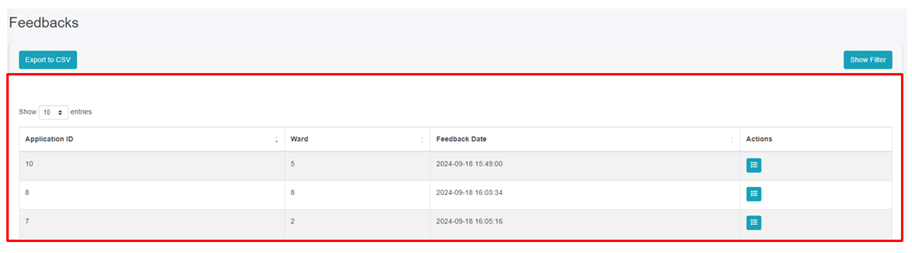
Figure 10- 29 List of Feedback
Note:
· Edit and Deletion of Feedback data is permitted only by super-admin and sanitation department.
· One help desk cannot delete feedback data created by another help desk.
Feedback created at, is more than 24 hours old from the current date, deletion is allowed. The same rule applies to editing. If this time frame has not been met, only super-admin is permitted to delete records.
10.6.5 Help Desks
The Help Desks sub-module maintains information related to the help desk established within the city.
• Open the sidebar and click on the ‘Fecal Sludge IMS’.
• Now, click on the ‘Emptying Service IMS’ and select Help Desks.
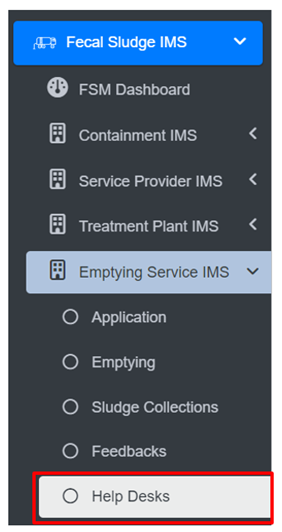
• This redirects to the Help Desks page.
Overview:
User can view the list of help desk created and provides different Filters, Actions and Tools that can be used according to the requirements. For more details (refer to section 5 Filters, section 6 Actions and section 8 Tools).

Figure 10- 30 List of Help Desk
b) Add Help Desk
· Click on the ‘Add Help Desks’ button.
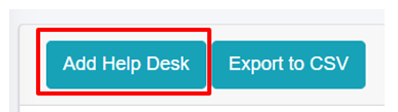
· This redirects to the Add Help Desk form page.
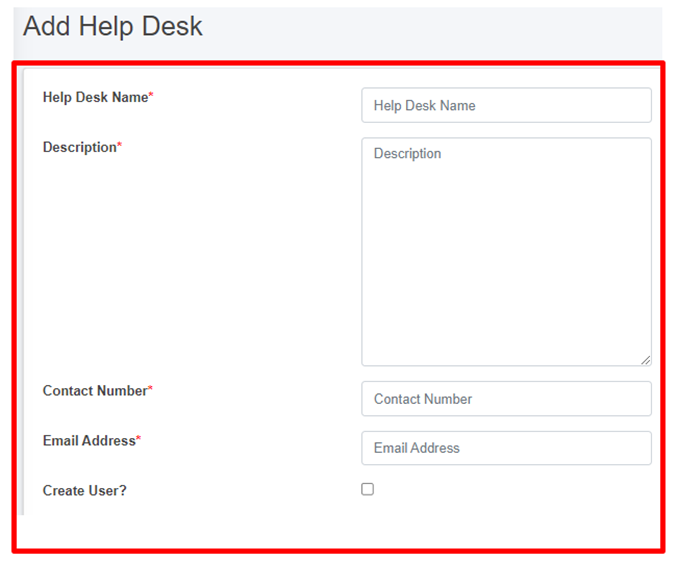
Figure 10- 31 Add new Help Desk
- After filling out the form, click Save and make sure a pop-up message is displayed, refer to section 7.1 Save for more details.
- If a mandatory form field is left out or any form failed validation during the form submission a validation message box will be prompted, refer to section 7.2 Validation Message Box for more details.
Overview:
The form fields of the help desks are explained below:
· Help Desk Name - Name of the help desk.
· Description - Additional information about the help desk
· Contact Number - Contact number of the help desk (It takes numeric values only).
· Email Address - Email address of the help desk
If the "Create User" option is chosen, it is essential to fill in both the "Password" and "Confirm Password" fields, and then the access credentials will be created as well. However, for existing user who do not select the "Create User" option, the password-related fields will not be shown.
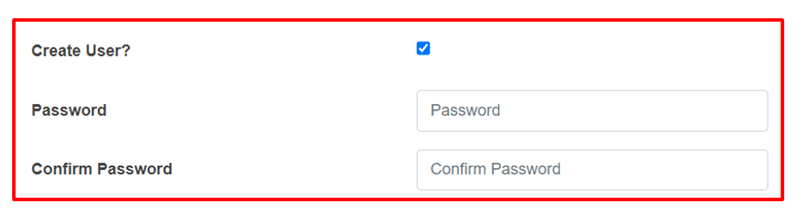
- When the user selects “Create user”, a new help desk user will be created with the corresponding credentials.
Note:
· Deletion of Help Desk data is not permitted when it is associated with User data.