Emptying Information Collection Mobile App User Manual
- EIC
- Introduction
- App Installation
- Accessing the IMIS
- Dashboard
- Collecting Emptying Services Information
- Miscellaneous
EIC
|
Emptying Information Collection Mobile App User Manual |
|
© 2022-2025 by ISPL & GWSC-AIT is licensed under CC BY-NC-SA 4.0 Version 1.0.0 |
Introduction
Purpose
This document is designed to guide Desludging Vehicle Operators on how to use the Emptying Details Collection Mobile App. The app allows collection of the emptying information while providing the emptying service, such that the information can be updated in real-time. The mobile application is used by emptier to collect the information such as emptying start and end time, number of trips, total cost for emptying, and the payment receipt number. Emptying details can be viewed in real-time by the help desk and other municipal staff who have access to this module. The user manual details the step-by-step procedure of all implemented facilities within the App. It is to be noted that information related to the actual emptying operation can also be entered into the system through the Web interface. The main purpose of this application is to provide the user with guidance to fill in the details of the emptying service and view the applications received. It provides an easy-to-use interface that connects the emptying operator with the IMIS web application.
Target Audience
Targeted users of this manual are Desludging Vehicle Operators of the Municipality or Outsourced Agency. This manual guides to performing details related to actual emptying operations.
App Installation
App Installation
An APK file will be made available in common access location or shared via link that can be downloaded and installed on your device.
Installation Procedure
- Download the APK file in your device and go to ‘Downloads’ folder using the ‘File Manager’.


Figure 2-1 APK File
- Locate the corresponding .apk file and tap on it. Installation process will begin.
- Tap on ‘SETTINGS’ button and allow the access, if system asks permission to install app from unknown source.
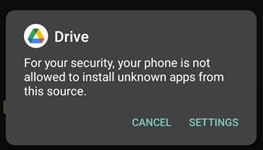
Figure 2-2 Access Permission
-
Tap on ‘Install’ button. An “Installing…” progress bar will be displayed.


Figure 2-3 Installation process
Tap on ‘Open’ button after installation process is completed.
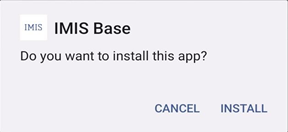
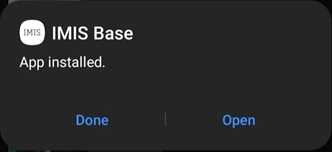
Figure 2-4 opening app
Overview:
- The installed app can also be accessed from App drawer or Launcher.
Accessing the IMIS
Opening the app/ Login
- On opening the app for the first time, the user is asked for their login credentials.
- Enter email address and password in textbox.
- Click on 'LOG IN' button.
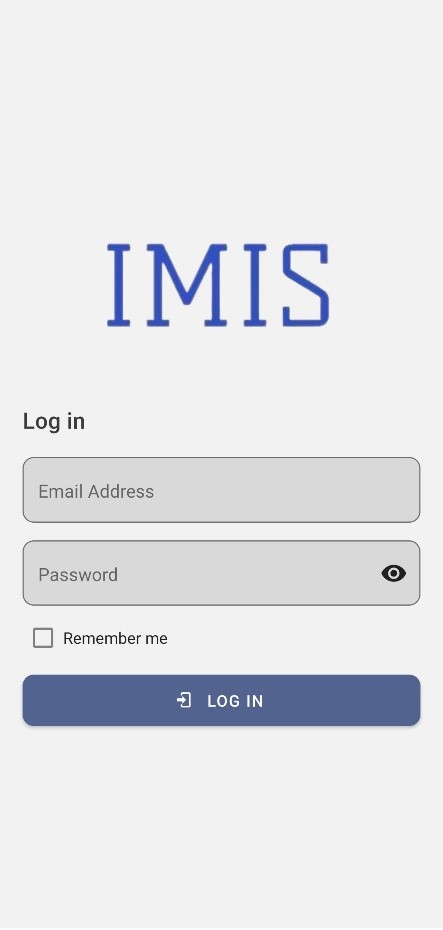
Figure 3-1 Login
Overview:
- This login credential is created and provided by the Municipality Admin to the Engineering and Building Permit Department.
- The application retains the login information until the user's session becomes inactive and expires.
- It is to be noted that GPS needs to be turned on while using the mobile application. When the user is using the app for the first time, the user must provide the location permission to the app.
- Once successful login, the user is redirect to the Dashboard screen
Dashboard
Navigate to Dashboard
- After successful login, a dashboard page is displayed.
- The user must select 'Emptying Service' card to enter details related to emptying service.
- Click on the three dots at the top right corner to get the log out option.
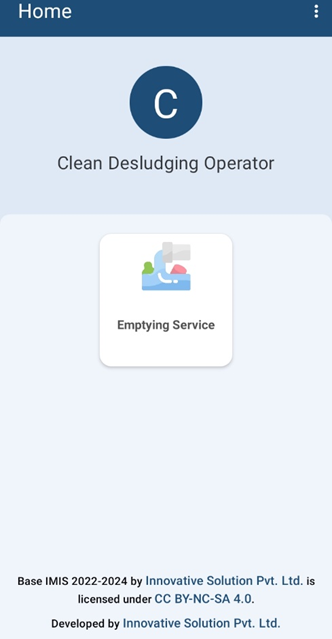
Figure 4-1 Dashboard
Overview:
- Once the user is successfully logged in, the user is redirected to the Dashboard screen.
Collecting Emptying Services Information
Navigate to emptying service
- For collecting the emptying service details of the application, click on the Emptying Services on the dashboard.
- Once clicked, the user will be directed to a list of applications that have been created.
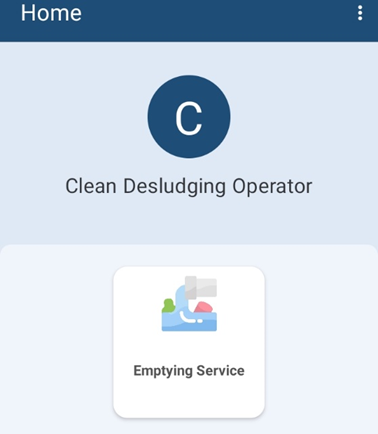
Figure 5-1 Emptying service
Overview:
- To initiate the emptying service process, the user must first access the Application List page.
- After the user is directed to the application list page, user can see the list of applications to fill up the details related to actual emptying operation.
Tools:
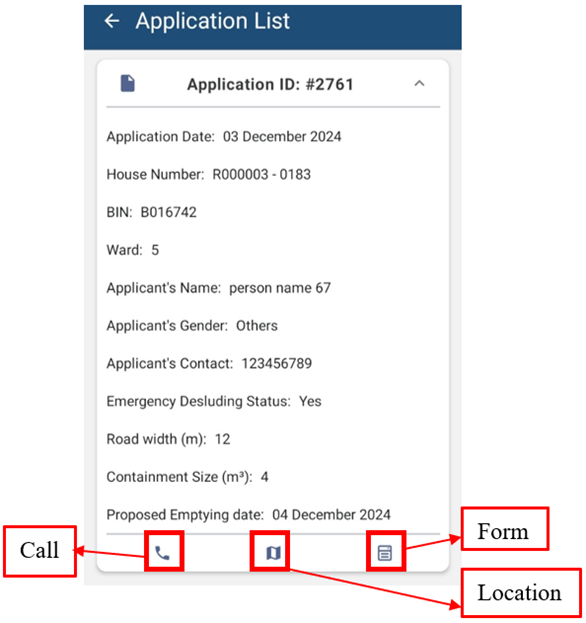
Figure 5-2 Application list
- Call: Click on the phone icon to call the Applicant directly.
- Location: Clicking on location icon allows the user to view the location of the user’s containment that needs to be emptied on a map. After clicking the map icon, the user will be redirected to the google maps interface.
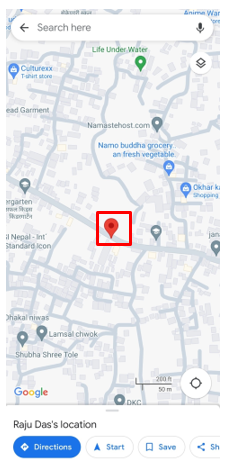
Figure 5-3 Location on Map
- Form: Clicking on the form icon permits the user to fill up the form required for emptying the containment service.
Overview:
- Applicant locations are based on each application received.
Emptying Service Data Collection
- On clicking the Form button, it redirects to the emptying service form.
- Fill the form on site with the required details and the user must press ‘SUBMIT’ button to upload the details to IMIS.


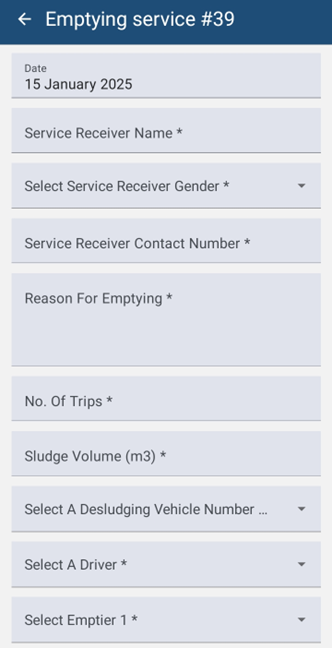
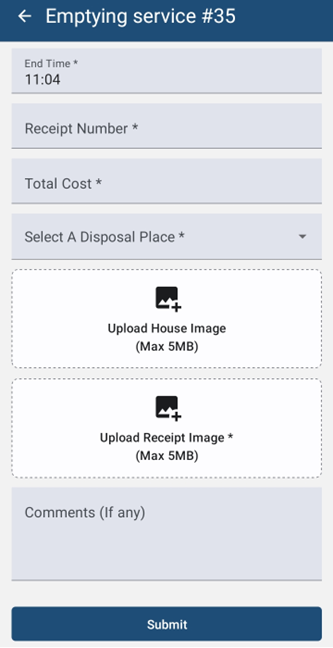
Figure 5-4 Emptying service form
Overview:
The Emptying service details page consists of different form fields which are mentioned below:
· Date (A.D): The date is auto-filled.
· Service Receiver Name: Full name of the service receiver who was present at the time of emptying.
· Service Receiver Gender: The gender of the service receiver who was present at the time of emptying.
· Service Receiver Contact Number: Contact number of the service receiver who was present at the time of emptying (This field allows only the numeric values).
· Reason For Emptying: The reason for which the containment was emptied.
· No. of trips: The total number of trips required to empty the sludge (This field allows the numeric values).
· Sludge Volume: The amount of sludge that has been collected. A rough estimation can be entered in meter cube (m3)
· Desludging Vehicle Number Plate: The desludging vehicle license number plate which is used for emptying
· Select a Driver: Select the driver’s name who is responsible for operating the desludging vehicle.
· Emptier 1: The name of the first emptier involved in the emptying process.
· Emptier 2: The name of the second emptier involved in the emptying process.
· Start Time: The starting time of emptying the containment.
· End Time: The ending time of emptying the containment. The end time must be after the start time.
· Receipt Number: The receipt number generated after the emptying process.
· Total Cost: The total cost of the emptying process (This field allows only the numeric values).
· Disposal Place: The treatment plant where the sludge is disposed.
· House Image: - Before submitting the form, the user must attach an image of the building where the sludge was emptied. If the house image is already available on the website, the option to upload a new house image will not be accessible, and you are not required to upload it from the mobile app. However, if the house image is not present on the website, the user will need to upload it from the mobile app.
· Receipt Image: The image of receipt generated after the emptying process.
· Comments (If any): Comments to share the user's thoughts after the emptying process.
Note:
· For uploading the image of the House and Receipt, the maximum image size that should be uploaded is “5 MB”. The submitted data is then sent to the IMIS web application. Also, the image format should be in JPEG.
· All fields marked with an asterisk (*) are mandatory and must be completed to submit the form. If any necessary fields are left empty, the application will not permit the user to continue. Incomplete fields will be highlighted in red to show which ones need to be filled in.
· Sludge volume should not be more than its containment size capacity.
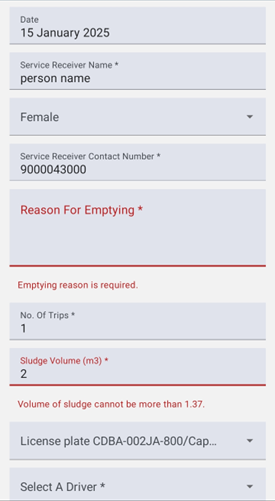
Figure 5-5 Empty Field Red Highlight
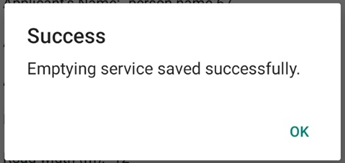
Figure 5-6 Success Message
Miscellaneous
Miscellaneous (Permissions)
Overview:
- When the user first uses the application, they must provide the Location Permission to the app.
- Allow IMIS Base to access this device’s location, photo and media requested by the app by clicking “While Using the App”.
- The user is also prompted to turn on location services at all times while using the mobile application.

Figure 6-1 Location permission

Figure 6-1 Photo and Media permission