Database Setup
4.1 Blank Database Import
A blank database of the IMIS is maintained in the GitHub organization under the repository deployment_documentation. This blank database is imported into PostgreSQL through pgAdmin. The database server (PostgrSQL) must be connected through pgAdmin initially: For the steps refer to Section Connect to db through pgadmin.

Figure 5 Select Restore and choose the provided database to restore
Step 1 : Download the blank database from the GitHub repository.
Step 2 : Open pgAdmin and connect to your PostgreSQL server.
Step 3 : Navigate to your server's "Databases" folder.
Step 4 : Right-click on the target database where you want to import the schema and data, and then select "Restore..." from the context menu.
Step 5 : Under the "Format" section, choose "Custom or Tar" from the dropdown menu. This format allows you to import both schema and data together. Browse the file by clicking on the "..." button in the "Filename" field.
Step 6 : Select the correct format of the file you are restoring, dump or backup.
Step 7 : Go to “Data Options” tab, under the "Do not save" section, check the box labeled "Owner".
Step 8 : Click "Restore”.
Step 9 : If prompted, enter the password for the database superuser.
Step 10 : Update the .env file in the web-application server with the corresponding values of the database, such as database name, credentials, etc.
The restoration process will start, and pgAdmin will import the schema and data into the target database. The time it takes to complete depends on the size of the database dump. Explore the tables and other database objects to verify that the schema and data have been imported.
Note: When restoring a PostgreSQL database, permission issues could arise if the original owner specified in the backup does not exist on the target system. To overcome this issue, Exclude Ownership Restoration as mentioned in Error! Reference source not found.. This corresponds to the `--no-owner` flag, telling pgAdmin not to set ownership of the objects to the original user from the backup.
4.2 Configure Environment Variables (.env)
Configure the environment settings for the IMIS project, which define essential application and database connection parameters.
In the IMIS project directory, locate the .env.example file. Copy this file and rename the copy to .env. This file will hold environment-specific settings for your local IMIS deployment.
Open the .env file in a text editor and set the following configurations for the PostgreSQL database connection and set the appropriate paths for the different provided variables as well:
|
|
||||||||||||
|
4.3 Database Seeder
The default look-up values for various dropdowns and default roles, permissions and user access can be setup through the seeder. Run the database seeder command:
php artisan db:seed
4.4 Importing Data into IMIS
The blank database provided does not contain any data apart from the look up values updated through the seeder. The initial dataset obtained from the survey must be cleaned and processed into individual SQL dump files, that follows the naming standards and data types as mentioned in the data dictionary. The table names, field names and data types must exactly match the data dictionary/ database.
4.4.1 Data Importing Sequence
As the IMIS is developed based on a relational database, the import sequence of the datasets must be followed strictly to ensure that there are no issues during the importing process. The import sequence is provided below:
|
S.N. |
Schema Name |
Table Name |
Type |
|
1 |
layer_info |
citypolys |
spatial |
|
2 |
layer_info |
landuses |
spatial |
|
3 |
layer_info |
waterbodys |
spatial |
|
4 |
layer_info |
wardboundary |
spatial |
|
5 |
layer_info |
grids |
spatial |
|
6 |
layer_info |
wards |
spatial |
|
7 |
layer_info |
ward_overlay |
spatial |
|
8 |
layer_info |
sanitation_system |
spatial |
|
9 |
utility_info |
roads |
spatial |
|
10 |
utility_info |
water_supplys |
spatial |
|
11 |
fsm |
treatment_plants |
spatial |
|
12 |
utility_info |
sewers |
spatial |
|
13 |
utility_info |
drains |
spatial |
|
14 |
layer_info |
places |
spatial |
|
15 |
layer_info |
low_income_communities |
spatial |
|
16 |
building_info |
buildings |
Spatial |
|
17 |
fsm |
containments |
Spatial |
|
18 |
building_info |
build_contains |
Non-Spatial |
|
19 |
building_info |
owners |
Non-Spatial |
|
20 |
fsm |
toilets |
Spatial |
|
21 |
fsm |
build_toilets |
Non-Spatial |
4.4.2 Importing Spatial Data
To import any table, follow the data dictionary and prepare data layers in QGIS with proper column name then import data into PostgreSQL database.
Step 1 : Data Preparation: Create PostgreSQL SQL Dump file (repeat the same process for all the spatial data), ensure the table name, field names and data formats matches exactly with the data dictionary/database.
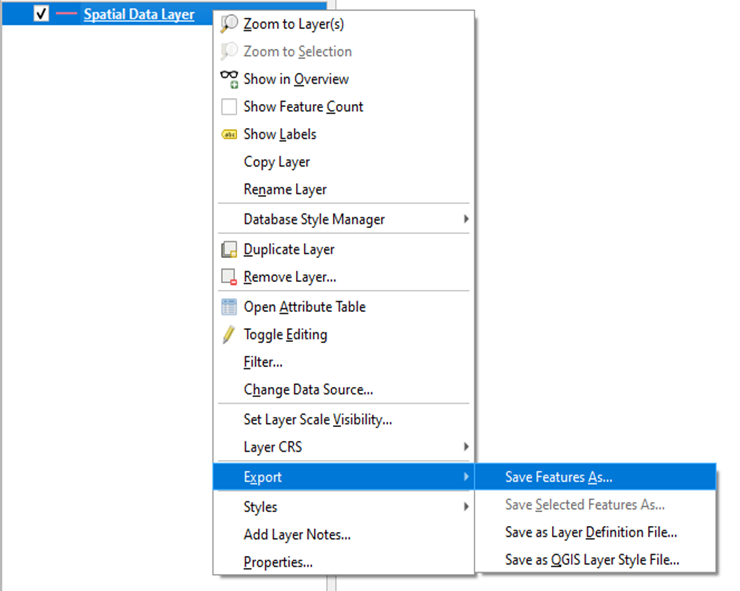
a. Select the ‘Spatial data Layer’ with all the required attributes (following the data dictionary)
b. Right click and go to ‘Export’ option and select ‘Save Feature As…’
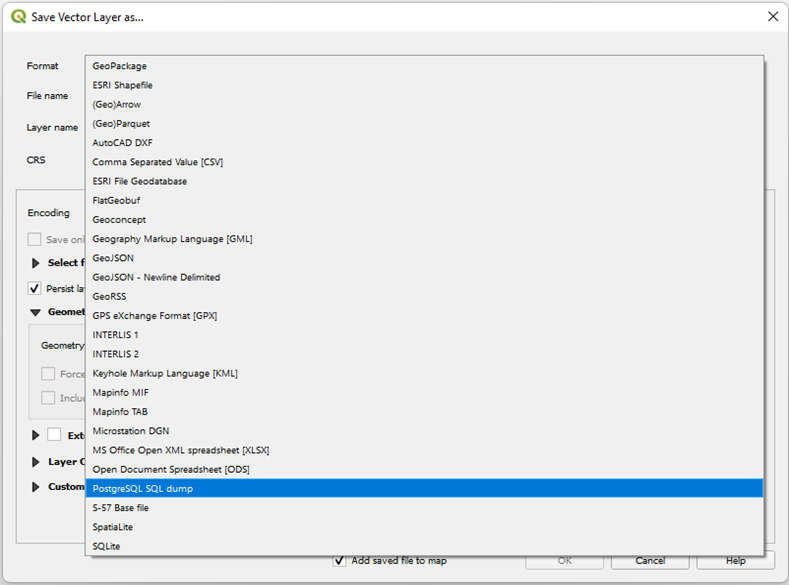
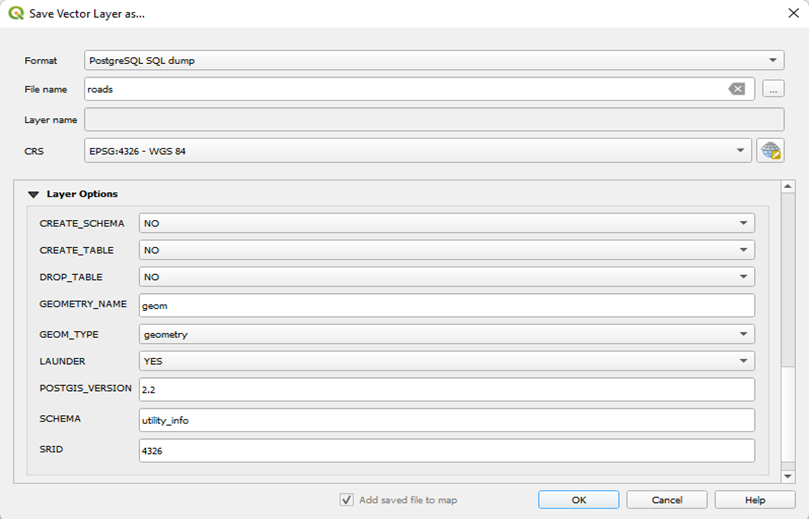
Step 2 : Select the format: ‘PostgreSQL SQL Dump’
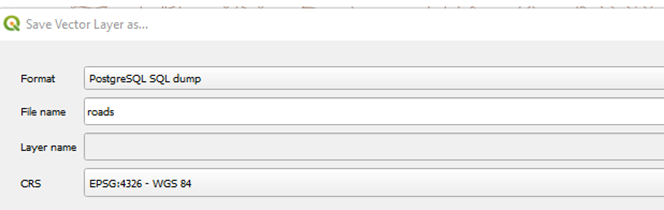
a. Select File Location and Give filename same as Table Name.
Example: for table roads:
b. In Layer Options:
i. CREATE_SCHEMA: NO
ii. CREATE_TABLE: NO
iii. DROP_TABLE: NO
iv. GEOMETRY_TYPE: GEOM
v. SCHEMA: SCHEMA_NAME
vi. SRID: 4326
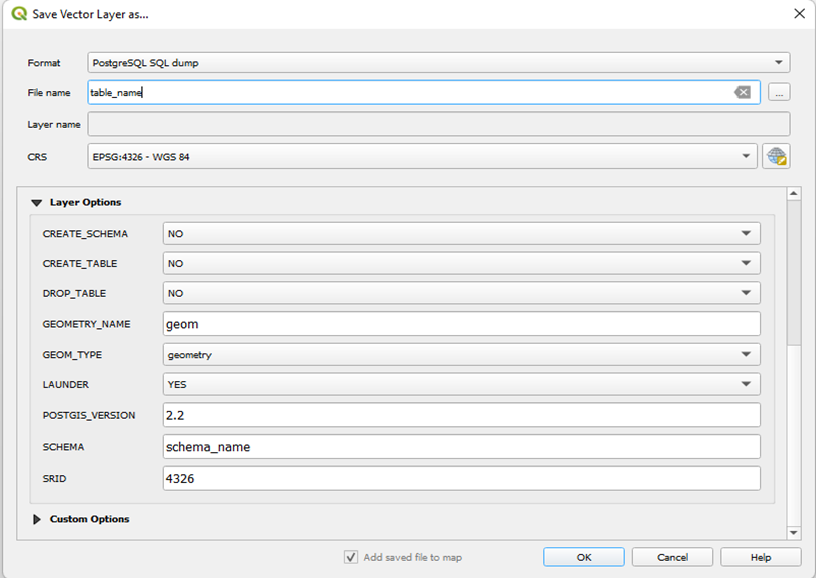
c. In Layer Options: For Table ‘roads’
Step 3 : Import into database via Pg-Admin.
a. Open Pg-Admin.
b. Open/Connect to Database
c. Right click and open the Query Tool.
d. Click on ‘Open file’ icon and select the exported SQL Dump File.
e. Click on ‘Run’ Button and execute the commands.
f. Check if all the data has been imported or not.
4.4.3 Importing Non-Spatial / CSV Data
Step 1 : Launch pgAdmin and connect to your PostgreSQL database server.
Step 2 : Right-click on the table where you want to import the CSV data.
Step 3 : Select ‘Import Data’ from the right-click menu.
Step 4 : In Filename option, navigate to your CSV file's location and select the file.
Step 5 : Choose CSV from the format options.
Step 6 : If the CSV file has column headers in the first row, check the Header box.
Step 7 : Click OK to start the import process.
4.5 Build and Triggers Functions Setup
Functions and Triggers are used in IMIS to automate and streamline database operations that perform specific tasks within the database, such as updating counts in real-time, supporting map tools, and import modules. Triggers are used in IMIS to automatically execute predefined actions in the database, such as updating counts maintaining data consistency, whenever data insertions occur, without manual intervention. This setup improves overall performance by executing predefined actions efficiently, making the system responsive.
Run the following commands to build all the necessary functions and triggers required for the system to function correctly:
Creates Functions and triggers to update count for grids &wards and summary chart
php artisan buildfunction:updatecount
Creates or replace (Or Delete and create) maptool queries if not exists functions
php artisan buildfunction:maptool
Creates Functions to create table when new data is imported for tax payment, watersupply and swmpayment:
php artisan buildfunction:taxphp artisan buildfunction:watersupply
php artisan buildfunction:swmpayment
Create quarters data for FSM KPI dashboards.
php artisan kpi:cron
When importing data in bulk or during the initial setup, it’s recommended to disable the trigger, update the count manually, and then re-enable the trigger to ensure accurate data processing without unnecessary overhead during the import process.
4.6 Summary Data Count Update
During the initial setup or after importing data, you need to update the count in the summary tables manually, but once the system is up and running, a trigger will automatically update the count each time new data is added.
To update grids & wards count when buildings have changes
php artisan updatecount:buildings
To update grids & wards count when fsm.containments has changes
php artisan updatecount:containments
To update grids & wards count when utility_info.roads has changes
php artisan updatecount:roadlines
To update grids & wards count when fsm.applications has changes
php artisan updatecount:applications