Tools Installation
2.1 Localhost Server (WAMP Server) Installation
To set up a local server, download and install WAMPP from the official website. WAMP Server is recommended due to its ability to handle multiple PHP versions.
IMIS requires PHP version 8 or higher, as this version is essential for compatibility. Any version changes will require modifications to the deployment process and source code.
Once WAMPP is installed, launch the Apache server, and check the PHP version by navigating to http://localhost/dashboard/phpinfo.php. Ensure the PHP version is at least 8; if not, update WAMP Server or manually configure PHP to use version 8 executable if available. Additionally, ensure that the following extensions are installed:
• ext-zip
• pdo_pgsql
• pgsql
2.2 Composer InstallationComposer is essential for managing dependencies in Laravel applications. Download and install Composer (V 2.2.7) globally from the https://getcomposer.org/, enabling system-wide access.
To confirm successful installation, open the command prompt and run:
|
Composer -v |
This command verifies that Composer is installed correctly and ready for managing Laravel dependencies.
2.3 Database Installation
IMIS is designed and developed with PostgreSQL (V 14) database. For GIS data storage and processing, the PostGIS extension (V3) is used.
2.3.1 PostgreSQL Download and Installation
Download PostgreSQL (V14) from the official website
https://www.postgresql.org/download/
During installation, use default port 5432, or adjust it if needed to avoid conflicts.
Be sure to select essential tools like pgAdmin, which provides an intuitive interface for database management, query execution, and PostgreSQL configuration—making setup and ongoing management easier.
2.4 PostGIS Extension
PostGIS is required within PostgreSQL to enable GIS (Geographic Information System) data management for IMIS.
2.4.1 Enable PostGIS Extension
To install PostGIS,
Locate Your PostgreSQL Installation:
• Open File Explorer.
• Navigate to C:\Program Files\PostgreSQL.
• Identify the version of PostgreSQL you have installed (e.g., C:\Program Files\PostgreSQL\14).
Open Stack Builder:
• Inside the PostgreSQL installation folder, go to the bin subdirectory (C:\Program Files\PostgreSQL\14\bin).
• Run the StackBuilder.exe application.
• In Stack Builder, select your PostgreSQL version, then locate "Spatial Extensions" and choose PostGIS.
Follow the prompts to complete the installation, which will enable PostgreSQL to handle spatial and geographic data.
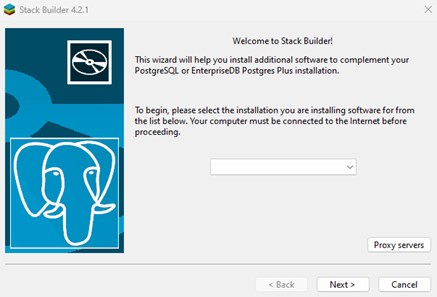
Figure 1 Stack Builder
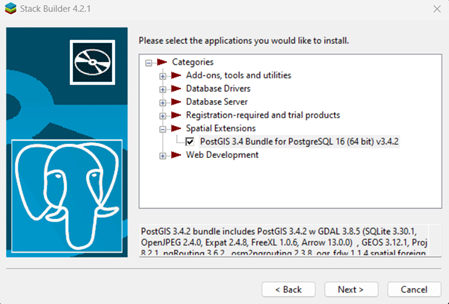
Figure 2 Select PostGIS extensions
2.5 GeoServer Installation
IMIS currently uses Geoserver (V2.21.0) for rendering and displaying spatial data maintained in the system. This specific version of Geoserver is recommended to ensure bugs/issues do not arise in the system.
2.5.1 GeoServer Download
Downloading V2.21.0 from the Geo Server page on Source Forge.
https://sourceforge.net/projects/geoserver/files/GeoServer/2.21.0/GeoServer-2.21.0-winsetup.exe/download
Geo Server requires a Java Development Kit (JDK) version 11.
Download the appropriate JDK installer for your operating system from the Oracle JDK website or from:
https://adoptium.net/en-GB/temurin/releases/?os=windows&version=11&package=jdk
Then install it in the Java folder within Program Files. Once the JDK is installed, configure it in your system’s environment variables so that applications can recognize Java.
[Note: Remember the username and password during installation process.]• Open System Properties > Environment Variables
• Under System Variables, locate the Path variable, click Edit, and add the path to the JDK's bin directory (e.g., C:\Program Files\Java\jdk-11\bin).
• Click OK to save the changes.
• Once the JDK is configured, run the Geo Server installer and follow the prompts to complete the installation.
• Make sure to browse the JDK path, while adding just add JDK path not the bin path.
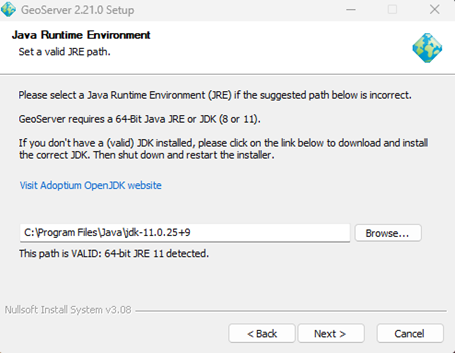
Figure 3 Intallation of geo server(Browse the path to JDK)

Figure 4 Add port 8080
2.5.2 Install Plugins for Geo Server
To enhance GeoServer functionality, certain plugins are essential.
a) CSS Plugin
Download the CSS Plugin using the following link:
https://sourceforge.net/projects/geoserver/files/GeoServer/2.21.0/extensions/geoserver-2.21.0-css-plugin.zip/download
b) Query Plugin
Download the Query Plugin using following link
https://sourceforge.net/projects/geoserver/files/GeoServer/2.21.0/extensions/geoserver-2.21.0-querylayer-plugin.zip/download
c) Printing Plugin
Download the Printing Plugin using following link
https://sourceforge.net/projects/geoserver/files/GeoServer/2.21.0/extensions/geoserver-2.21.0-printing-plugin.zip/download
d) Copying the Plugins
Once downloaded, unzip the files and copy all the files with jar extension and place it in following path:
C:\Program Files\GeoServer\webapps\geoserver\WEB-INF\lib
Once successfully added the plugins restart the GeoServer.
No Comments